A few years ago, Coveo wanted to offer the possibility to store customer data outside the United States. Early in the project, it was decided that we would only have one user directory. If our users had to manage organizations created in different regions, we wanted them to avoid having to log in each region individually. This meant that we would have only one database to store users. This blog post will explain how we achieved a central user directory while avoiding big latency issues.
Architecture
To get things going, our initial goal was to launch a new platform in Europe. The US infrastructure would essentially be replicated in Europe but with one difference: the service managing the user directory was going to connect to the same database as the one running in the US. Here is what our initial development setup looked like.

With this initial development setup, the new platform launched in Europe worked, but we quickly realized one big problem; it was really slow. We had to come up with a better solution before going live.
We started looking into how we could get a read-only replica that could be in Europe and help reduce latency for read-only transactions. Read-only transactions represent the vast majority of requests we receive for this specific service. At the time, we had a standard Aurora MySQL database. We quickly found that it could be migrated to a global database. AWS Aurora global databases maintain a single logical global cluster with multiple regionalized clusters in it. With it, you can easily spin an Aurora cluster in multiple regions and AWS will manage the replication on its own. Though not entirely transparent on the technical side, you can even failover your main cluster to a different region.
As of today, Coveo offers the possibility to have data stored in the United States, the European Union, and Australia. The architecture of the service currently looks like the diagram below.
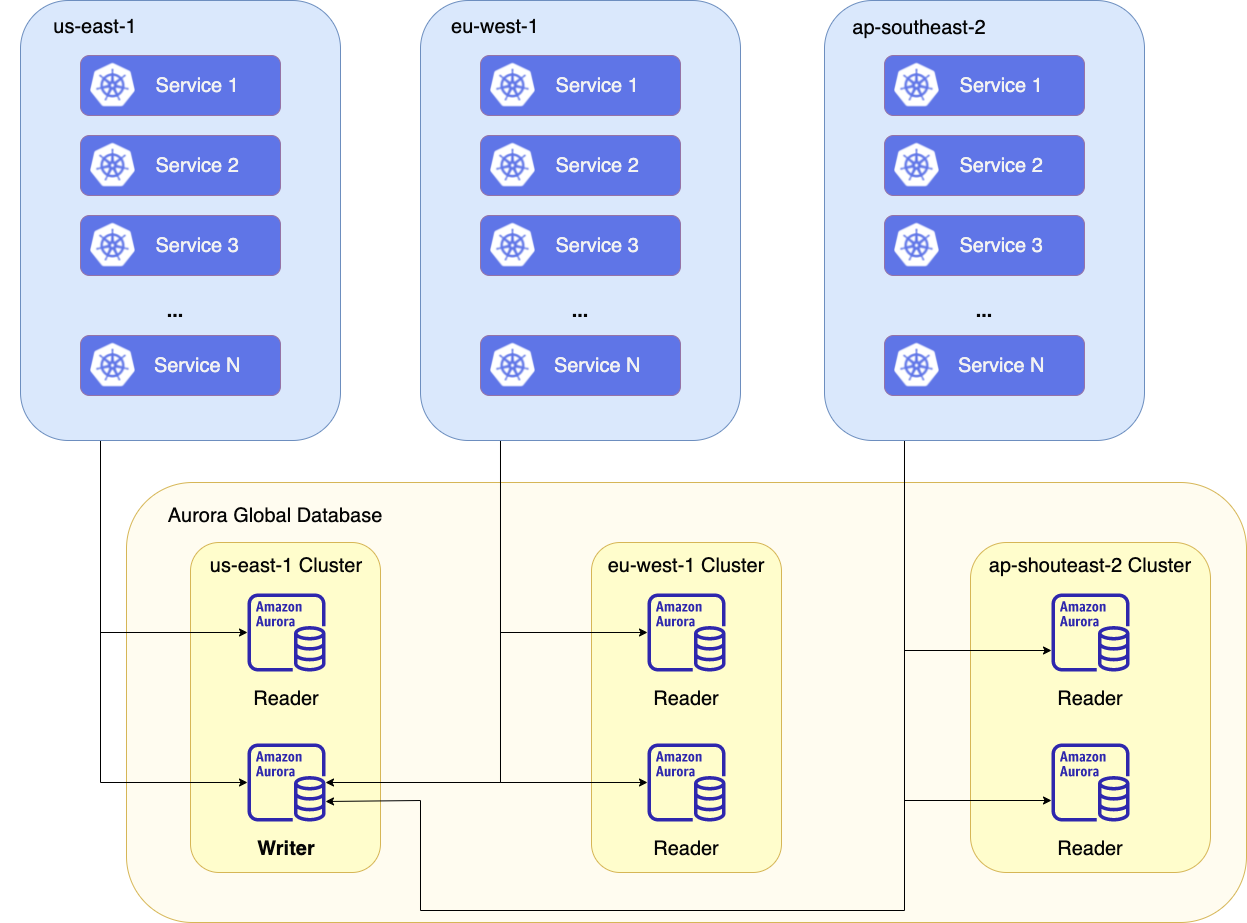
Of course, this solution is not perfect. As you can see in the diagram above, a global database can only have one writer instance. Since all regions need to write into this database, we had to find a way to send all read transactions to local reader instances and all write transactions to the writer instance wherever this instance is. Doing so is not supported out of the box with Spring, so we came up with a solution.
Solution Using Spring Routing Data Source
First, I want to mention that what is described below is not needed for your primary region that contains the writer instance. For the region with the writer instance, you can use the Aurora failover mode on your data source and the MariaDB driver will take care of using any read instance available in the cluster.
What I’m describing below is needed when an application has to use a local read-only cluster and the primary cluster for write transactions.
To achieve this transaction routing, we will be using the @Transactional and @Transactional(readOnly = true) annotations to help determine which data source to use for each method in our code. The hard work of managing transactions with the database is already done in Spring. Below, I explain how to create a transaction manager that wraps an existing transaction manager. It intercepts transactions and sets the proper data source when something is using the getTransaction() method. I also describe everything else required around it to achieve this:
- An application configuration with 2
Datasource - A configuration class to read custom properties
- A routing data source class
- A transaction synchronization class
- A transaction manager class
Application Configuration
The first thing needed is a way to specify the configuration of both data sources.
It’s important to point out a few things in the configuration above:
- jpa.open-in-view is disabled.
- We are using the MariaDB driver to work with Aurora database clusters.
- We define our own key (primary, secondary) under the datasource key.
- Both data source URLs are a little bit different.
Open-in-view
Our implementation is using the JPA transaction manager. It’s important to make sure open-in-view is disabled. Disabling this feature makes sure a new session is created for each transaction. This, in turn, ensures that nothing is left behind from previous transactions and allows the transaction manager to properly set the data source to use. More details on this configuration property can be found in this page.
MariaDB Driver
We are using the MariaDB driver, as per recommendations from the AWS documentation. Our tests also showed that failovers are detected and handled within a few seconds when using the MariaDB driver, compared to several minutes with the standard MySQL driver. Failovers occur when the writer instance encounters issues. In this case, AWS automatically promotes a reader instance to become a writer instance. The driver detects those changes and automatically uses the new instance as the writer. The documentation for this driver can be found here.
Custom Data Source Keys
For the primary data source, the Aurora failover mode is used. We also specify the cluster endpoint that contains the writer instance. All pods in every region will be using the same cluster endpoint. In case of issues with the writer instance, this configuration allows us to quickly failover to the reader instance inside that cluster without having to modify any configuration in any region.
For the secondary data source, we have to use a different failover mode. Clusters in each secondary region contain 1 to N read-only instances. When using the aurora failover mode, and the cluster endpoint, the MariaDB driver is unable to connect because it cannot find a writer instance. To work around this issue, we used the loadbalance mode and specified all instances’ endpoints separated by a comma.
Configuration Class
This configuration class takes care of instantiating all the necessary beans that will use our custom transaction manager.
When using an application configuration with the spring.datasource.url key populated, Spring takes care of instantiating the transaction manager for you. In our case, since we are using custom keys to define data sources and that we want to wrap an existing transaction manager, we have to do this work.
Our project was already using the JPA transaction manager, so we started by creating a bean for that.
We then create the transactionManager bean which is our custom wrapping transaction manager. We provide it with the jpaTransactionManager in order to use it and let it manage transactions. You can find the implementation of this transaction manager below.
The entityManagerFactory bean is needed to make sure the entity manager can be instantiated properly and use our routing data source. This allows it to use the proper data source and scan the right package for @Entity annotations.
The globalClusterRoutingDataSourceMetricsConfiguration bean is created to expose metrics for the secondary data source. You can find the code of this class in the demo application here.
The primaryDataSourceProperties and secondaryDataSourceProperties are the beans that take care of reading the configuration defined earlier.
Finally, the routingDataSource is the bean that implements AbstractRoutingDataSource.
Routing Data Source
Spring already has something in place to help route getConnection() calls to various data sources based on lookup keys. To achieve this you can extend the AbstractRoutingDataSource class. Here is what our implementation looks like.
The important method is determineCurrentLookupKey(). In it, we specify where to read which data source to use. In our case, we are storing this value in the resource map defined in the TransactionSynchronizationManager. Using the transaction synchronization manager ensures that we don’t overwrite this value. More on it can be found in the Spring documentation.
Transaction Synchronization
The transaction synchronization class is there to help manage nested transactions. In this class, we are keeping a queue where we store previous data source types (primary, secondary). When suspending a transaction, we are adding to the queue and when resuming we are popping from it. We are also making sure to clean up anything written in the Transaction Synchronization Manager in order to avoid any potential memory leak and unwanted exceptions.
Transaction Manager
Our custom transaction manager wraps an existing transaction manager already available in Spring.
The getTransaction() method is where we determine the proper data source to use. We start by getting or initializing our transaction synchronization class using the getOrInitializeGlobalClusterAwareTransactionSynchronization() method.
Since there is a small lag with the data replication between the writer and reader instance, we want to prevent transactions from switching from a read-only source to the read-write source. Preventing this helps reduce the chance of working with old data and overwriting something that was not yet replicated. To prevent this from happening, we check for 4 conditions: Is a transaction already active? Is the current transaction not requiring a new transaction? Is the current transaction in read only? Is the new transaction definition not in read only? If all 4 conditions are met, we throw an exception.
To fix problematic code paths, we can either set the proper readOnly value in the @Transactional annotation or we can set the propagation value to force a new nested transaction using @Transactional(propagation = Propagation.REQUIRES_NEW).
From there, the data source type is set in the transaction synchronization and we call the getTransaction() method from the wrapped transaction manager.
The rest of the code in getTransaction is there to handle nested transactions using our transaction synchronization class. We added some comments on each line to explain a bit how this is working.
Below is the full implementation of this class.
Transactional annotation
From there, all you have left to do is set the @Transactional everywhere needed. In our case, we usually set those annotations on methods inside service classes or in utility classes that are defined as beans.
Be careful to avoid some of the pitfalls related to this annotation. Since this post is already getting long, I will let you search for those yourself, but just to put you on the right track, here are a few things to look for:
- The method’s visibility has to be public.
- The method has to be inside a bean known by Spring (
@Bean,@Component,@Repository, …) - The invocation must come from outside of the bean, otherwise the annotation is ignored.
- Make sure to properly handle exceptions for rollback using something like
@Transactional(rollbackFor = Exception.class). - Any change made within a transaction to an entity will automatically be populated to the database at the end of the transaction, without the need for an explicit save.
A small demo application with all the code snippets shown above can be found here:
https://github.com/coveooss/global-aurora-database-with-spring
You can launch this application and confirm you are able to connect to 2 distinct data sources.
I hope you found this post interesting!
Thanks to Jacques-Étienne Beaudet, Frédéric Boutin, Andy Emond, Alexandre Moreau and Marie-Christine Noreau who were kind enough to review this blog post.
If you are looking to solve challenges like the one described above make sure to check out our careers page and apply to join the team!
Sources
https://blog.pchudzik.com/201911/read-from-replica/
https://www.baeldung.com/spring-open-session-in-view
https://mariadb.com/kb/en/failover-and-high-availability-with-mariadb-connector-j-for-2x-driver
https://codete.com/blog/5-common-spring-transactional-pitfalls
https://www.baeldung.com/transaction-configuration-with-jpa-and-spring