I have been recently trying some new technologies, such as our own Coveo Headless Library, which aims to replace Coveo JavaScript Search Framework with a smaller headless state management library, and Svelte, which aims at writing less and clearer code to achieve the same results as a React or VueJS app.
Those two technologies are so great and fun to work with that I could not wait to use them together. So this blog post will do exactly that: Let’s build a minimal search page using Svelte and the Headless library.
Setting up the repository
This blog was updated on 2021-04-01 to use the new SvelteKit instead of Sapper
For this example, we will use SvelteKit, a small framework that builds a Svelte app with many modern features such as Server-side rendered pages, which is very useful for SEO in Commerce.
mkdir coveo-svelte-headless
cd coveo-svelte-headless
npm init svelte@next

npm install @coveo/headless
npm install
npm run dev
You can now open localhost:3000 and directly edit the files, with hot-reload support! Yes, this is already very impressive.
Now, let’s remove some of the code that will not really be needed in index.svelte, which now looks like this:
<svelte:head>
  <title>Coveo Headless + Svelte</title>
</svelte:head>

<div>Hello from Coveo</div>
We are now ready to integrate Headless!
Creating the Engine
The first thing to do is to create a Headless engine. This engine holds the state of a single Search Interface.
For this blog, we will use the sample configuration:
// src/lib/SearchEngine.js

import { HeadlessEngine, searchAppReducers } from '@coveo/headless';

export const searchEngine = new HeadlessEngine({
  configuration: HeadlessEngine.getSampleConfiguration(),
  reducers: searchAppReducers
});
Creating the Controllers
We must then create a controller to interact with that engine’s state.
// src/lib/SearchBox.js

import { SearchBox, buildSearchBox } from '@coveo/headless';
import { searchEngine } from "./SearchEngine";

export const searchBoxController = buildSearchBox(searchEngine);
The buildSearchBox method creates a controller for a search box. It exposes a couple of methods such as updateText to update the currently typed text, and submit to submit a query.
It would be nice to leverage Svelte’s store management system, so let’s subscribe to the controller’s state and expose it:
// src/lib/SearchBox.js

import { buildSearchBox } from '@coveo/headless';
import { searchEngine } from "./SearchEngine";
import { writable } from "svelte/store";

export const searchBoxController = buildSearchBox(searchEngine);
export const searchBoxState = writable(searchBoxController.state);
searchBoxController.subscribe(() => searchBoxState.set(searchBoxController.state));
In Svelte, a writable store is a value that can be listened to. You can subscribe to the store by using the (very convenient) $ syntax, such as $searchBoxState.results. Each time the state changes, anything that uses $searchBoxState will be re-rendered accordingly.
Now, it would not be super useful to have only a search box without seeing the results, so let’s do the same with a result list:
// src/lib/ResultList.js

import { buildResultList } from '@coveo/headless';
import { searchEngine } from "./SearchEngine";
import { writable } from "svelte/store";

export const resultListController = buildResultList(searchEngine);
export const resultListState = writable(resultListController.state);
resultListController.subscribe(() => resultListState.set(resultListController.state));
Creating the Svelte Components
And here comes the fun part, wrapping those states and controllers into Svelte components:
// src/lib/SearchBox.svelte
<script>
  import { searchBoxController } from "./SearchBox.js";

  let text = "";
  $: searchBoxController.updateText(text);

  function handleKeyUp(e) {
    if (e.key === "Enter") {
      searchBoxController.submit();
    }
  }
</script>

<input bind:value={text} on:keyup={handleKeyUp} />
For those unfamiliar with Svelte, the language makes a clear distinction between const and let, where let are reactive variables. Meaning that each time the value changes, anything that renders it will trigger a re-render.
The $: syntax makes it so any reactive variable that changes will trigger this line, so reassigning text would call updateText here. Pretty neat!
We then use the bind:value={text} syntax to ensure that any letter typed in the input is replicated in the text variable. Again, pretty neat!
We are now ready to create our simple ResultList Svelte component:
// src/lib/ResultList.svelte
<script>
  import { resultListState } from "./ResultList.js";
</script>

<div>
  {#if $resultListState.results.length === 0}
    {#if $resultListState.loading}
      <span>Loading...</span>
    {:else}
      <div>No Results</div>
    {/if}
  {:else}
    {#each $resultListState.results as { clickUri, title }}
      <div>
        <a href={clickUri}>{title}</a>
      </div>
    {/each}
  {/if}
</div>
Here, we import the store and simply listen to it! No rocket science at play here, but the #each block might need some explaining. It will iterate over the results and render the HTML template for each result. The as { clickUri, title } syntax is simply extracting the two keys from each result by using Object destructuring. I think the resulting code is surprisingly pretty clean and readable!
Integrating the components back into the Search Page
Now, let’s integrate those two components in our home page:
// src/routes/index.svelte

<script>
  import SearchBox from "$lib/SearchBox.svelte";
  import ResultList from "$lib/ResultList.svelte";
</script>

<svelte:head>
  <title>Coveo Headless + Svelte</title>
</svelte:head>

<div>
  <SearchBox />
  <ResultList />
</div>
You can see the $lib value in the import path. This is a convenient virtual path that points to the “lib” folder.
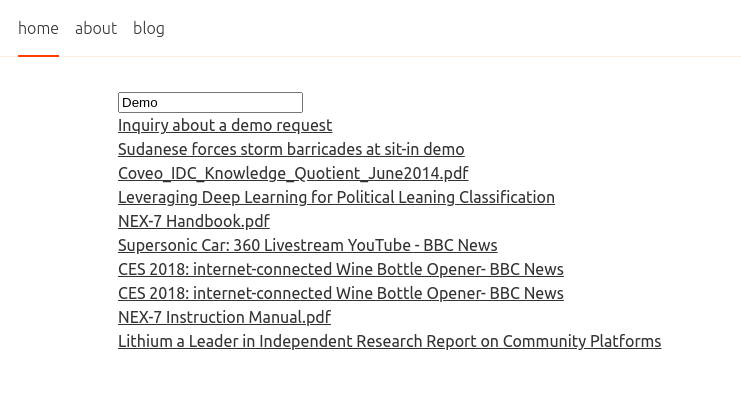
With these changes, get back to your localhost:3000, click on the search box, hit Enter, and:

That’s it!
Next Steps
This was a quick introduction to both libraries, but you can see how easy it is to use both and what a great match they are together.
There is still a lot of work to do to make it usable in the real world, though.
Styling
Styling is super easy in Svelte. It is coded directly in the components, all you have to do is create a style tag directly in your Svelte file and start using its classes! Note that all classes are scoped by components by design! See the Svelte documentation for more details.
Implementing Other Headless Features and Controllers
There are many more features we could implement here, such as query suggestions (which is already integrated in the Searchbox controller) or more specific ones, such as the Commerce Cart Recommender. I would encourage you to explore the Headless Reference and find the ones that you would like to implement.
If you like cool front end technology like we do, why not join the Coveo team and explore even more new technologies?
