This is the first blog post of a new series entitled “Build it with Coveo”. The series will present innovative use cases for the Coveo Platform, always including full code samples.
Coveo customers use the platform in a multitude of ways. Many in the consulting and resource management business often ask us if our search technology could help them better match resources and projects.
Use case:
What if you want to find the best peer/employee with knowledge around “Artificial Intelligence.”? What if you need to add constraints such as “available for the next two months.”?
Typical approach/solution:
When using a search engine, your default behavior will be to organize your search journey as follows:
- First search in your Resume database/repository for people with “Artificial Intelligence” in their resume
- Once suitable individuals are identified, look up their locations
- Once you know their location, check in the HR database if they are working on a project in the next 2 months
This is very time consuming and arguably not very efficient. You can do better! How can we improve this whole journey? Easy: build an index containing all the data you need and surface it into a Resource Locator interface everybody can use.
What do you need?
Before you start building a UI, you need to have (at least part of) the following data available. For each person you need:
- People records (are they in Active Directory, or in a Database?)
- For each Person you need an ID to identify them (like an employee unique ID))
- Resumes. The metadata of the resume should mention the unique employee ID
- Availability database. When is a person available should be stored in here (typically HR-IS systems, ERP, etc.)
Since you’ll probably want to geocode the cities so you can display everything nicely on a map, you’ll need a database with cities and/or zip codes (and their Latitude/Longitude).
Phase A. Getting the content into your index
You first need to make sure that all the content is in a single index. Coveo provides connectors to index most of the data wherever it comes from (database, Salesforce, sitemaps, custom repository using the push API, etc.).
In this example I am using 3 “Push sources” to get the desired content in the index. For more info on Coveo’s Push API: Push API Reference
There is one more challenge: the People records do not contain the Latitude/Longitude for the location and the availability data. Of course I could gather that before I push the content, but I can also use an “Indexing Pipeline Extension” which can be called before each record is added to the Coveo index. For more info: Extensions and Push API Reference.
The steps involved for enriching the data are:
-
- Getting the [Latitude/Longitude] for a Zipcode/City from a DynamoDB database (hosted on AWS) - don’t worry: if you are an Azure fan, you can refactor the code.
-
- Getting the [Availability] for a person from a DynamoDB database (hosted on AWS).
-
- Getting an image for the person and add it to the thumbnail of the search result.
Extensions can also log data, which can be retrieved later, but I found it easier to log the results into an index field (called myerr), so I can use the Coveo Content Browser to examine the progress/debugging of my script. Should only be used for debugging purposes.
myerr=''

#logging, both to myerr field and to document.log
def mylog(message):
    global myerr

    #Log using the normal logging
    log(message)
    myerr+=';'+message
    #Log using a field ONLY for debugging purposes
    document.add_meta_data({"myerr":myerr})
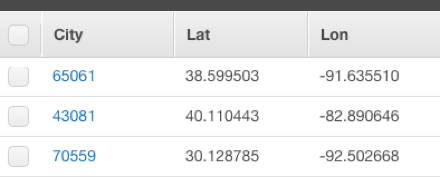
1. Getting the [Latitude/Longitude] for a Zipcode/City from a DynamoDB database
From the internet I got two files, one containing US ZIP codes (Zip Codes) and one with the World cities (World Cities) coordinates. I used a Python script to easily import txt/csv files into a DynamoDB (Script).
Next, you load all that data into a DynamoDB database (using the above script) and, bam, you are ready with the geocoding part!
Now, you need to add that information to your people records. Each record in the directory contains a field called locationzip or similar which we need to assign to a Coveo Field. In your Cloud Organization configuration (Fields - Page), add a brand new field called myzip and assign the value %[locationzip] to it in the Person content source:
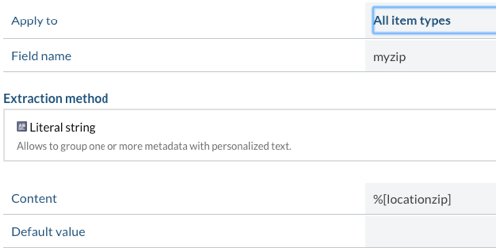
Note: In the Coveo Indexing Pipeline Extension you could use the metadata from the document directly or the mappings defined above. So in our case you could get the %[myzip] or directly the %[locationzip] fields. Mapping fields is only necessary if you want to display the field in the UI, use the field as a Facet, or use the field as a relevancy booster.
You also need to create the following fields using the technique above: mylat2 (Decimal), mylon2 (Decimal), myusername (String), myrownr (String).
Next up: the Indexing Pipeline Extension script.
Extension scripts are created in Python and the following libraries are available by default: requests, boto3, pymongo, msgpack-python, and pytz. For more information: Document Object Python API Reference.
To create the script: Extensions - Page.
Make sure to check the boxes only for the type of content you really need; this will save valuable execution time:
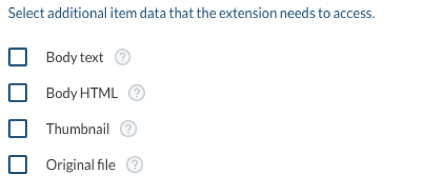
For example, only select [Original File] if you want to change the original document. For this use case, you do not need to modify any of the original content, so none of the checkboxes are needed.
Our script does the following:
- Gets the metadata field (myzip or locationzip)
city=document.get_meta_data_value('myzip') mylog("Zip:"+' '.join(city)) - Builds up a connection to Dynamo DB and our Table
# If city is there get the Lon/Lat from dynamoDB if (city): try: found=False #Now we fetch the lat/lon from the db dynamodb_session = Session(aws_access_key_id='xxxx', aws_secret_access_key='xxxx', region_name='us-east-1') dynamodb = dynamodb_session.resource('dynamodb') table=dynamodb.Table('GEOCODE') - Executes the query (note: primary keys in Dynamo DB are case sensitive)
mycity=city[0].lower() mycity2=mycity if (mycity.isdigit()): #Pad with zeros mycity2=format(mycity, '05') mylog("Execute query with city "+str(mycity2)) response = table.query( KeyConditionExpression=Key('City').eq(str(mycity2)) ) - Retrieves the results and stores them into our fields (mylat2, mylon2)
     for i in response['Items']:
         document.add_meta_data({"mylat2":str(i['Lat'])})
         document.add_meta_data({"mylon2":str(i['Lon'])})
         mylog("Getting lat"+str(i['Lat']))

 except Exception,e:
     mylog("Error: "+str(e))
Important: a script has a maximum execution time of 5 seconds. It is possible to add multiple scripts; they will be executed in the order you add them to the source.
Later, when the content is indexed, you can check in the Content Browser that the field [myerr] is populated. As such:
myerr Start;Zip:19103;Execute query with city 19110;Getting lat 39.952896
2. Getting the [Availability] for a person from a DynamoDB database
The next step in your Extension script is to get the Availability of a person. Normally, that information would be stored in a HR database.
You could again get that data from a Dynamo DB database which could be updated daily from the original database/repository. The only information you need in your database is the username/userid and the dates when the employees are available. Most important is that your Coveo field contains the dates when a person IS available.
In this scenario the end result of the script is a field called mydateavail which is filled with values such as these:
20170601;20170602;20170603;20170604;20170605;20170606;20170607;20170608;20170609;20170610;20170611;20170612;20170613;20170614;20170615;20170616;20170617;20170618;20170619;20170620;20170621;20170622
3. Getting an image for the person and add it to the thumbnail of the search result
Indexing Pipeline Extensions have access to all content; they can read permissions, update permissions, have access to all the fields, and to the content previews. Your current People record does not contain a thumbnail image to be shown when someone searches for a colleague or resource. The images are stored on a webserver with a naming convention [username.jpg]. The extension script can download them, and store them in the datastream for the thumbnail.
try:
    imagenr=int(document.get_meta_data_value('myrownr')[0])
    #Get the thumbnail
    thumbnail = document.DataStream('$thumbnail$')
    mylog("Nr to get:"+str(imagenr))
    myurl="http://www.myimage.com/images/me/"+str(imagenr)+".jpg"
    l = requests.get(myurl,timeout=4)
    #Get the image
    if "error" in l.content:
        mylog("No Image")
    else:
        thumbnail.write(l.content)
        mylog("Added Image")
        document.add_data_stream(thumbnail)

except Exception,e:
        mylog("Error: "+str(e))
Now that the script is ready, you need to assign it to your source. I first created the source Add Push Source.
For now we need to manually embed a reference to the Extension into the JSON of our source:
To do so: take note of the Indexing Pipeline Extension ID from the extensions page:
Goto your source, and hit ‘Edit JSON’. Scroll completely down and enter the above ID as:
"additionalInfos": {},
  "preConversionExtensions": [],
  "postConversionExtensions": [
    {
      "extensionId": "sewimnijmeijer01-qqaprrgphlaiqieqp3vkg3cgga",
      "parameters": {}
    }
  ],
You are now all set! You can start building up your index, check logs and start working on your search interface.
Phase B. Building a People Locator Search interface.
Now that the data is in your index, it is time to start building a search interface for it. These are the requirements.
-
- Search in People, People Resume’s, and Additional information records. Only show People records.
-
- Show the related records found for the current Person record.
-
- Take the selected availability dates into consideration, and show them at the result level.
-
- Provide a Google map to show the location of the people found, and enable the map to be used as a filter.
-
- Enable to click on a result on the map to show detailed information in a side-panel, including a proximity search.
The beauty of the Coveo Search Interfaces is that they are very flexible, all events can be intercepted, and changed.
1. Search in People, People Resume’s and Additional information records. Only show People records.
Our search interface should only show People records, but should search within the Resume and Additional records at the same time. Looks complicated, but this is part of Coveo’s capabilities. To do this, we need to add additional logic to our query. We do that by adding an event on the buildingQuery event See, but only when our People interface is active.
Coveo.$('#search').on("buildingQuery", function (e, args) {
	    //Only activate on people search interface
		if (Coveo.$('.CoveoSearchInterface').coveo('state', 't') == 'People') {
		}
	});
The query which we want to add is what we call a nested query. A nested query is essentially an outer join to another query. The requirement here is that our key-field must be a faceted value. In our case the field [myusername] is used and defined as a facet.
Before we can change our query, we first need to take the basic and advanced expressions from the current query.
var basicExpression = args.queryBuilder.expression.build();
var completeQuery = (typeof basicExpression === 'undefined') ? "" : "" + basicExpression + "";
var advancedExpression = args.queryBuilder.advancedExpression.build();
var advancedQuery = (typeof advancedExpression === 'undefined') ? "" : "(" + advancedExpression + ")";
The completeQuery variable now contains the text entered in the search box, while the advancedQuery parameter contains the facets and/or selection from the map.
The nested query will look like:
@mylat2 @syssource=WimPeople @myusername=[[@myusername] @syssource=(WimPeopleAdd,WimPeopleResume) (" + completeQuery + ")] " + advancedQuery
The nested query is the part between the []. In our example this translates in:
- Search in the sources WimPeopleAdd and WimPeopleResume for the text entered in the search box
- From the above, Report back the keyfield [@myusername]
- The usernames returned by the nested query will be used in the full query
A practical example:
Let’s search for Artificial Intelligence. Our nested query will look like:
@mylat2 @syssource=WimPeople @myusername=[[@myusername] @syssource=(WimPeopleAdd,WimPeopleResume) (Artificial Intelligence)]
In addition to the nested query, we also want to search the regular People records. The above nested query should be added as a disjunction expression (essentially an OR).
Putting all the pieces together will result in:
Coveo.$('#search').on("buildingQuery", function (e, args) {
   //Only activate on people search interface
   if (Coveo.$('.CoveoSearchInterface').coveo('state', 't') == 'People') {
	//We also want to add a nested query against the resume's
	// add the disjunction query to get all comments, attachments and tickets matching the query
	var basicExpression = args.queryBuilder.expression.build();
	var completeQuery = (typeof basicExpression === 'undefined') ? "" : "" + basicExpression + "";
	var advancedExpression = args.queryBuilder.advancedExpression.build();
	var advancedQuery = (typeof advancedExpression === 'undefined') ? "" : "(" + advancedExpression + ")";
	if (completeQuery != "") {
 	   //Be aware: in the nested queries the first key and the foreign key needs to be facets
	   args.queryBuilder.disjunctionExpression.add("@mylat2 @syssource=WimPeople @myusername=[[@myusername] @syssource=(WimPeopleAdd,WimPeopleResume)   " + completeQuery + "] " + advancedQuery);
	}
  }
});
2. Show the related records found for the current Person record.
Since we are only reporting People records, it would be nice if we could show the related records (e.g.: resume and any additional info) with the current result. To do so we created a custom component called ResultsRelated. ResultsRelated will show a ‘Show details’ hyperlink, which in turn will execute a separate query to fetch the related content based upon the current result.

For easy configuration the custom component can take different properties:
<div class="CoveoResultsRelated"
     data-result-template-id="RelatedResultsTemplate"
     data-normal-caption="Show Resumes or Related files"
     data-title-caption="Resumes or Related files for the same user"
     data-expanded-caption="Do not show Related Files"
     data-no-results-caption="No related files found"
     data-query="@myusername=[FIELD1] @syssource=(WimPeopleAdd,WimPeopleResume)"
     data-fields="myusername"
     data-number-Of-Results=5 ></div>
Using the properties, you can specify which fields to use, which queries to execute to the details, and which templates to use to render the results.
3. Take the selected availability dates into consideration, and show them at the result level.
To select an availability date range we added two calendar pickers using JQuery. Based on the selection of these dates we need to add these to the query.
Each selected date must be checked on the field if it exists, so we are building a huge AND query of the selected date range. We then add it to the current query.
var radiosel = $('input:radio[name=avail]:checked').val();
if (radiosel != 'All') {
	var addquery = getFullDates($('#CALMinimumDateTxt').datepicker('getDate'), $('#CALMaximumDateTxt').datepicker('getDate'));
	if (radiosel == 'Avail') {
		args.queryBuilder.advancedExpression.add("(" + addquery + ")");
	} else {
		args.queryBuilder.advancedExpression.add("NOT (" + addquery + ")");
	}
}
The resulting query would look like this:
"((artificial intelligence) ((@mydateavail="20170306" AND @mydateavail="20170307" AND @mydateavail="20170308" AND @mydateavail="20170309" AND @mydateavail="20170310" AND @mydateavail="20170313" AND @mydateavail="20170314" AND .... @mydateavail="20170428" AND @mydateavail="20170501" AND @mydateavail="20170502" AND @mydateavail="20170503" AND @mydateavail="20170504" AND @mydateavail="20170505" AND @mydateavail="20170508" AND @mydateavail="20170509" AND @mydateavail="20170510" AND @mydateavail="20170511" AND @mydateavail="20170512")) (@syssource=WimPeople @mylat2)) OR (@mylat2 @syssource=WimPeople @myusername=[[@myusername] @syssource=(WimPeopleAdd,WimPeopleResume) ((artificial intelligence))] ((@mydateavail="20170306" AND @mydateavail="20170307" AND @mydateavail="20170308" AND @mydateavail="20170309" AND @mydateavail="20170310" AND @mydateavail="20170313" AND @mydateavail="20170314" AND @mydateavail="20170315" AND @mydateavail="20170316" AND @mydateavail="20170317" AND @mydateavail="20170320" AND .... @mydateavail="20170428" AND @mydateavail="20170501" AND @mydateavail="20170502" AND @mydateavail="20170503" AND @mydateavail="20170504" AND @mydateavail="20170505" AND @mydateavail="20170508" AND @mydateavail="20170509" AND @mydateavail="20170510" AND @mydateavail="20170511" AND @mydateavail="20170512")))"
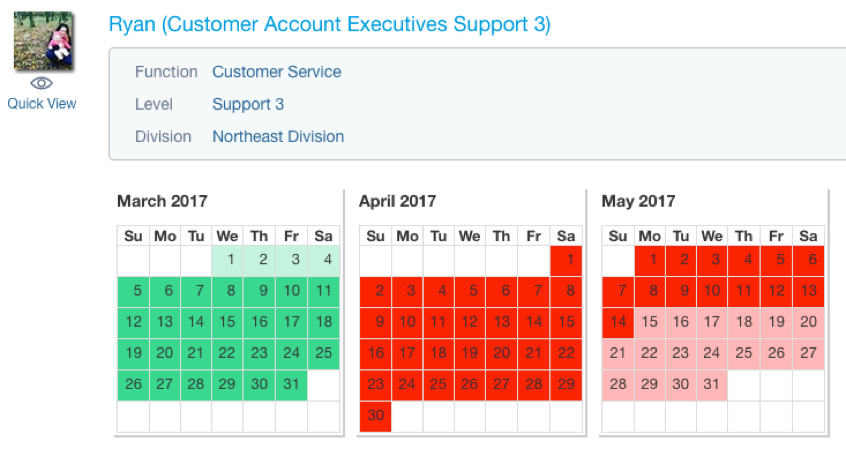
The query is ready, but we also want to show the calendar availability for each result. When a result is rendered, we need to add calendars (using fullcalendar.js) to it. Make the date available if our field mydateavail contains it. We use the event newResultDisplayed for that. We will use CSS to style the days.
//Add the calendar controls to the search results
Coveo.$('.CoveoSearchInterface').on('newResultDisplayed', function (e, args) {
	//Add the calendar to the result, only if it is selected
	var mycal = $(args.item).find('.Calendar');
	mycal.empty();
	if ($('#CALMinimumDateTxt').val() != "") {
		var Start = $('#CALMinimumDateTxt').datepicker('getDate');
		var StartDate = $('#CALMinimumDateTxt').datepicker('getDate');
		var EndDate = $('#CALMaximumDateTxt').datepicker('getDate');
		NrOfMonths = EndDate.getMonth() - StartDate.getMonth();
		for (i = 0; i <= NrOfMonths; i++) {
			var newcal = $('<div/>').addClass('mycalendar' + i).appendTo(mycal);
			newcal.css('width', '200px').css('display', 'inline-block').css('margin', '5px');
			newcal.fullCalendar({
				height : 150,
				width : 150,
				weekNumbers : false,
				columnFormat : 'dd',
				defaultDate : Start,
				contentHeight : 'auto',
				aspectRatio : 5,
				header : {
					left : 'title',
					center : '',
					right : ''
				},
				dayRender : function (date, cell) {

					if (date < StartDate || date > EndDate) {
						//disable it
						cell.addClass("NotSelected");
					} else {
						//disable it
						cell.addClass("Selected");
					}
					//If our result contains this date then available else not
					var curdate = moment(date).format('YYYYMMDD');
					if (args.result.raw[FieldnameAvailClean] != undefined) {
						if (args.result.raw[FieldnameAvailClean].indexOf(curdate) != -1) {
							//disable it
							cell.addClass("calAvail");
							cell.attr('title', 'Available');
						} else {
							//disable it
							cell.addClass("calNotAvail");
							cell.attr('title', 'Not Available');
						}
					}

				}
			});
			Start = new Date(Start.getFullYear(), Start.getMonth() + 1, Start.getDate());
		}
	}
});
Which will render the calendars as:
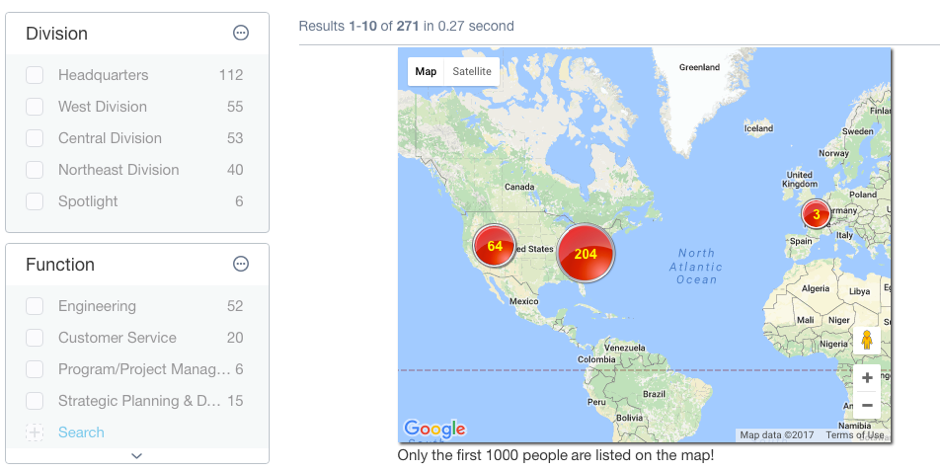
4. Provide a Google map to show the location of the resources found, and enable the map to be used as a filter.
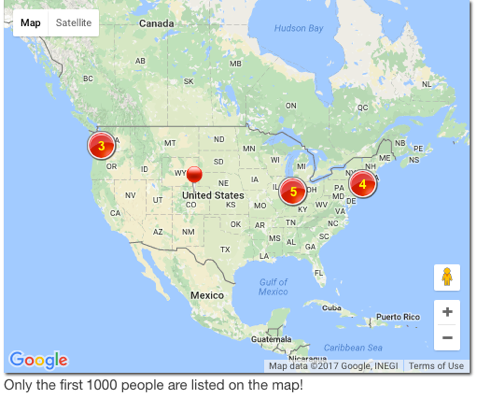
Since we have Longitude and Latitude available, we can use Google Map. By default, our search result list only contains the first 10 results but we want to get as much as results possible to show on the map. What we need to do is run a separate query to get the results of the first 1000 results (this is the max we can get from our REST api) and map them. This must be triggered after we have executed our normal search. So, we bind to the querySuccess event:
Coveo.$('#search').on('querySuccess', function (e, args) {
	if (Coveo.$('.CoveoSearchInterface').coveo('state', 't') == 'People') {
		mapQueryResults = args.queryBuilder.computeCompleteExpression();
		if (Coveo.Utils.isNullOrUndefined(mapQueryResults)) {
			mapQueryResults = '@uri @mylat2';
		}
		allreset = false;
		createResultsMap(mapQueryResults, "mylat2", "mylon2","People");
	}
});
This will trigger the update of our map with the fields mylat2, mylon2 and only on the search interface People.
The createResultsMap function calls the Coveo REST service for a separate query (defined in CoveoGoogleMap.js):
function createResultsMap(query, mylat, mylon, mytab) {
	$('#info').hide();
	tab = mytab;

	if (initmap)
	{
		updatebounds = true;
	}
	else
	{
		//If query contains mylat<= then it is a boundary query
		if (query.includes(mylat+"<="))
		{
			updatebounds=false;
		}
		else updatebounds=true;
	}
	google.maps.event.clearListeners(map, 'idle');
	bounds = new google.maps.LatLngBounds();
	initmap = false;
	latfield = mylat;
	lonfield = mylon;
	Coveo.SearchEndpoint.endpoints['default'].search({
		q : query,
		enableDuplicateFiltering : false,
		numberOfResults : 1000
	}).done(function (result) {
		createMarkers(result.results);
		if (updatebounds) {
			map.fitBounds(bounds);
		}
		setTimeout(
			function () {
			google.maps.event.addListener(map, 'idle', function (ev) {
				setTimeout(function () {
					mapEvent();
				}, 1000);
			});
		}, 1000);
	});
}
Important: first remove the ‘Idle’ event of the google map, draw the markers, and then add the idle event listener again.
When people are zooming/panning the map, the mapEvent is called. This happens after 1 second to make sure the map is completely loaded, including all the invisible tiles. The mapEvent will add an additional filter to our query, using:
var ne = bounds2.getNorthEast(); // LatLng of the north-east corner
var sw = bounds2.getSouthWest(); // LatLng of the south-west corder
var query = '';        |
if (ne.lat() > sw.lat()) //ne=67>sw=-5
{
	query = '@' + latfield + '<=' + ne.lat() + ' AND @' + latfield + '>=' + sw.lat();
} else {
	query = '@' + latfield + '>=' + ne.lat() + ' AND @' + latfield + '<=' + sw.lat();
}
if (ne.lng() > sw.lng()) //ne=67>sw=-5  -70 -142
{
	query = query + ' @' + lonfield + '<=' + ne.lng() + ' AND @' + lonfield + '>=' + sw.lng();
} else {
	query = query + ' @' + lonfield + '>=' + ne.lng() + ' AND @' + lonfield + '<=' + sw.lng();
}

mapQuery = query;
updatebounds = false;
Coveo.$('#search').on('newQuery', function () {
	if (Coveo.$('.CoveoSearchInterface').coveo('state', 't') == tab) {
		//Check if the mapquery is there, if so we need to add it to the query
		if (mapQuery != null) {
			Coveo.$('#search').coveo('state', 'hd', 'Results are filtered based on the map');
			Coveo.$('#search').coveo('state', 'hq', mapQuery);
		}
		mapQuery = null;
	}
});
Coveo.$('#search').coveo('executeQuery');
The query added to the results is simply:
@mylat2<=44.50728502178297 AND @mylat2>=37.904122033477144 @mylon2<=-67.79949543750001 AND @mylon2>=-78.78582356250001
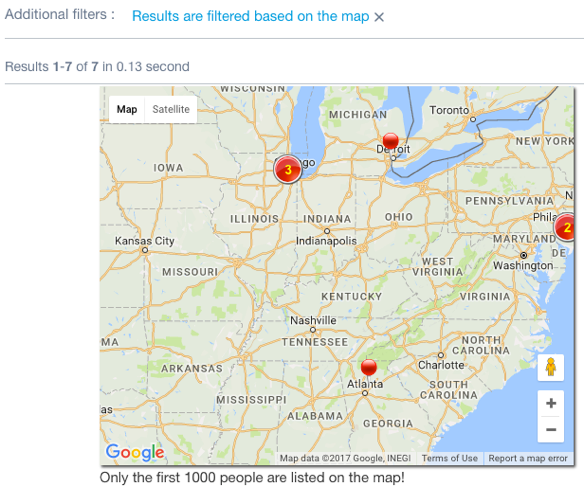
The additional filters will indicate that the map has been used as a filter and can be easily cleared if necessary.
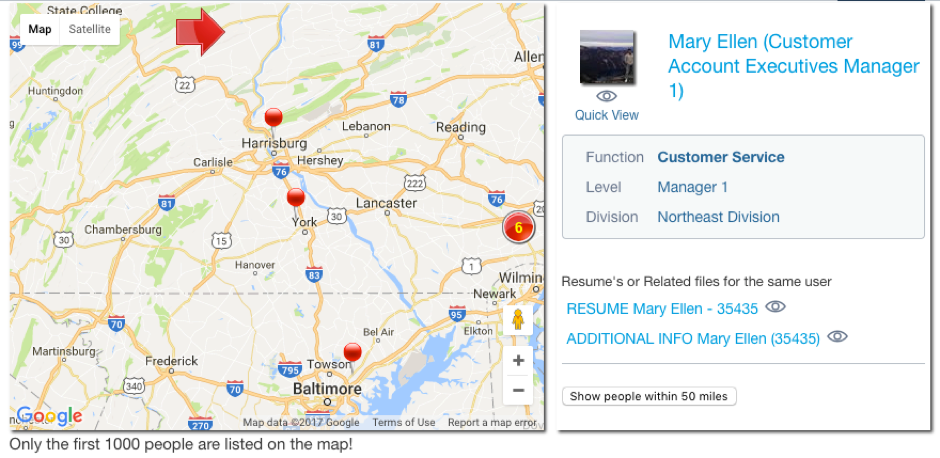
5. Enable to click on a result on the map to show detailed information in a side-panel, including a proximity search.
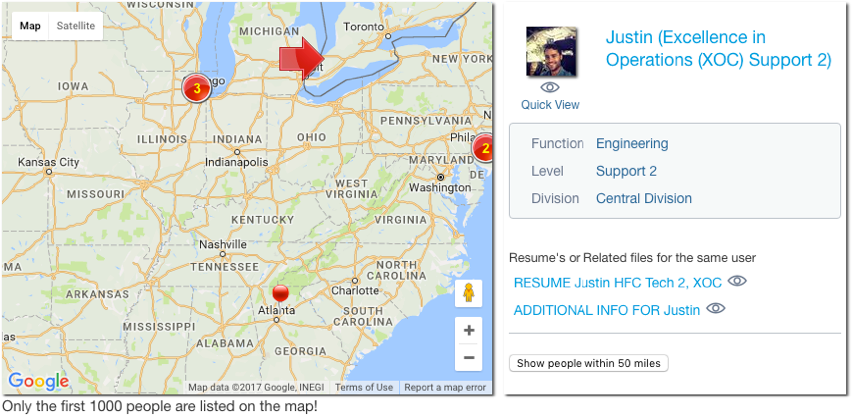
The infobox created when adding the markers onto the map contains the logic for showing the result in a side-panel.
google.maps.event.addListener(marker, 'click', function () {
	var resu = new Coveo.StandaloneResult(Coveo.$('.CoveoResultList').coveo('getBindings').searchInterface,
	Coveo.TemplateCache.getTemplate('PeopleSide'), marker.result);
	var contentString = "<div id='mymaprelated'>";
	contentString += "</div>"
	$('#info').html(contentString);
	var myres = Coveo.$('<div/>').addClass('coveo-folding-results').appendTo($('#info'));
	resu.initialize();
	myres.append(resu.element);
	myres.append(btn);
	$('#info').show();
	marker.setIcon('/lib/js/right.png');
});
The infobox will use a different result template (PeopleSide) which is defined in the page. As you can see, the result template directly shows the related content (without having to expand it).
To showcase the possibility to use distance searches, we also added a button to show people within 50 miles from the current selected result. The Query Extensions can be used to add a query function to calculate the distance (See).
In our case, we add the following query to the results:
$qf(function:'dist(@mylat2, @mylon2, CURRENTLAT, CURRENTLON)<80467',fieldName:'distance') @distance=1
This way, all the results which are within a 50 mile radius of the current lat/lon (80467 = 50 miles in meters) will get a dynamic field assigned called @distance. Since we only want to get the results which are within 50 miles, we add an additional filter to our query: @distance=1.
Simple, but very efficient!
var btn = $('<input />', {
	type : 'button',
	value : 'Show people within 50 miles',
	id : 'btn_a',
	on : {
		click : function () {
			//  Coveo.$('#search').on('newQuery', function () {
			if (Coveo.$('.CoveoSearchInterface').coveo('state', 't') == tab) {
				//Check if the mapquery is there, if so we need to add it to the query
				mapQuery = "$qf(function:'dist(@" + latfield + ", @" + lonfield + ", " +
				marker.getPosition().lat() + ", " + marker.getPosition().lng() + ")<80467',fieldName:'distance') @distance=1";
				if (mapQuery != null) {
					Coveo.$('#search').coveo('state', 'hd', 'Only showing results within 50 miles of the selected point.');
					Coveo.$('#search').coveo('state', 'hq', mapQuery);
				}
				mapQuery = null;
				//updatebounds=true;
			}
			//});
			Coveo.$('#search').coveo('executeQuery');
		}
	}
});
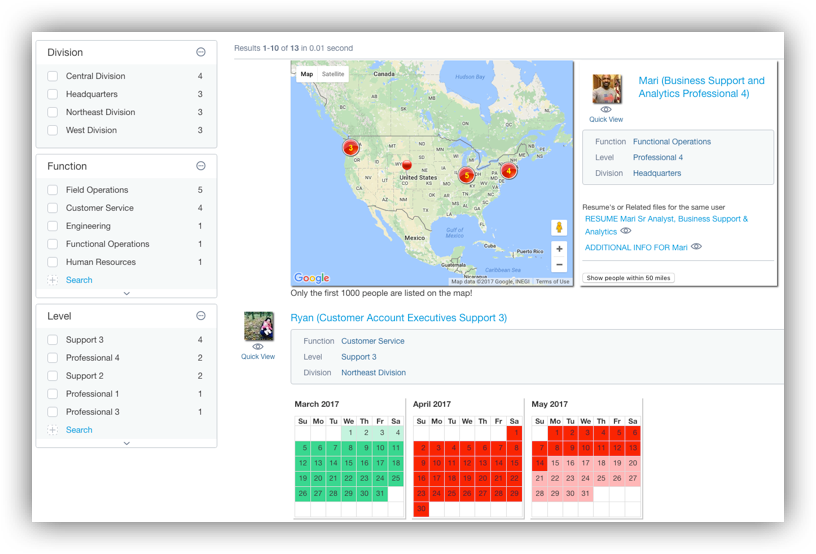
The final end result
Use case: “I want to find a “project development” consultant, which is available from March 5th to May 15th:”
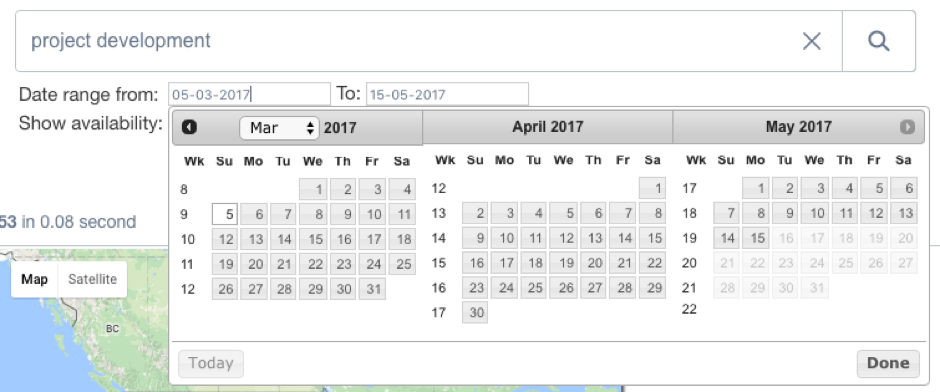
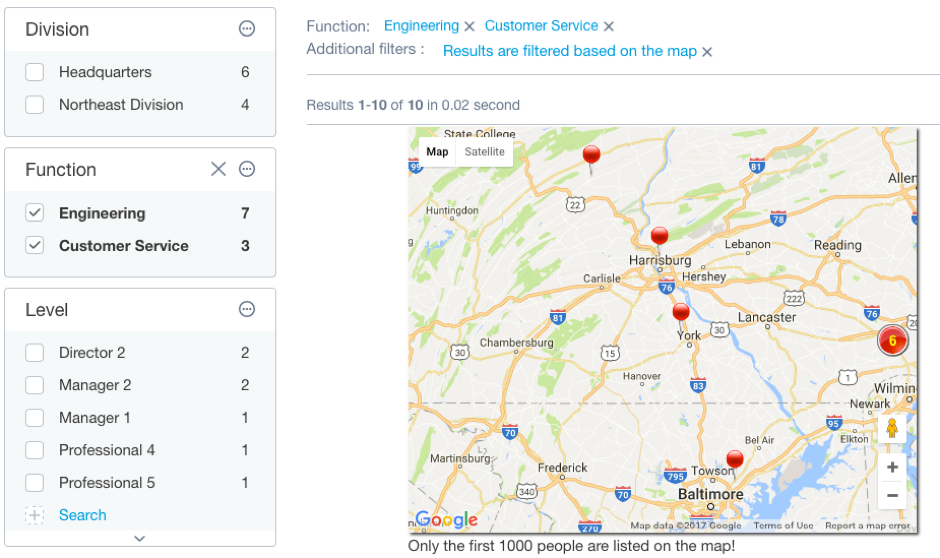
I found 271 people (which have project development in their People, Resume, or additional info records):
I want to focus on ‘Engineering and Customer Service’:
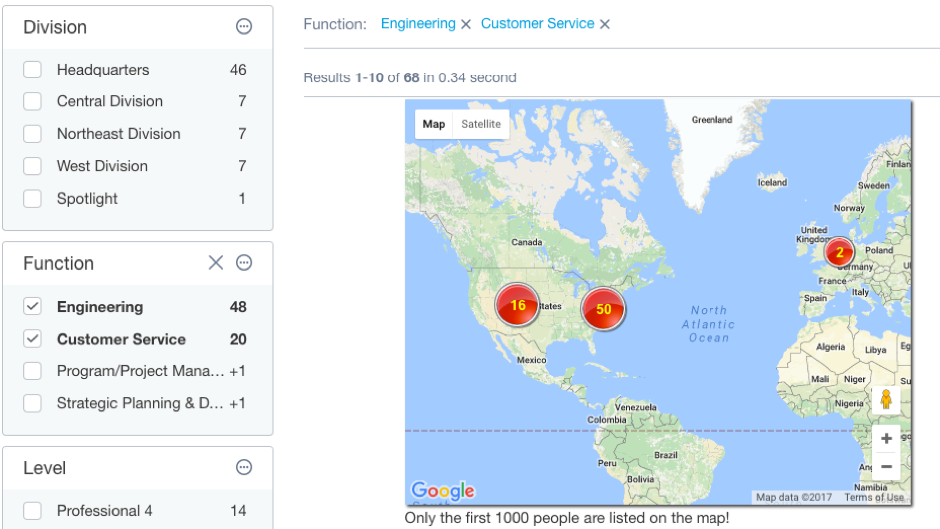
Let’s use the map to drill into the Philadelphia area:
Review one of our returned candidates:
By using the preview feature I can look into the person’s resume:
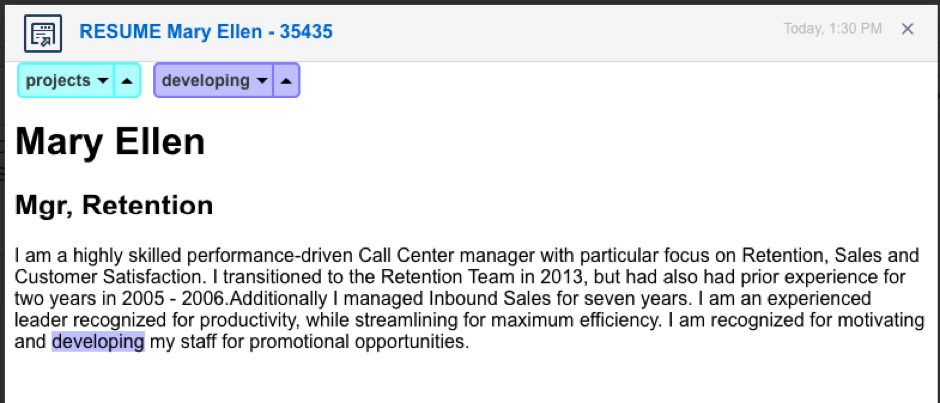
As you can see from the above, we search not only in the People records, but also in the Resumes. Use the facets to drill into our data; drill even further by using the map as a filter!
Sources:
I hope you enjoyed this (lengthy) post. Let us know what else you have built with the Coveo Platform!