This is the last part of my long adventure to cover all the best practices listed in the Best Practices for Site Search eBook. The previous parts can be found here.
Search Analytics and Reporting
In previous posts, I covered the global search box, the search result pages and the search driven content listing pages. It is now time to close this series with a more general topic affecting all the previously mentioned components: Analytics and tracking.
13. Track visitor activity
Coveo for Sitecore components will track all events on the page and send the data to the Coveo Usage Analytics.
You can also send these events to the Sitecore reporting database by setting the Enable Sitecore Analytics property on the Coveo Search View Rendering to true.
An event is only sent from a published page. You can track it by looking at the network traffic using a browser console or a web debugging proxy.
Here is an example of a payload sent to the Coveo Cloud Usage Analytics API:
{
  "actionCause":"documentOpen",
  "actionType":"document",
  "anonymous ":true,
  "device ": "Chrome ",
  "mobile ":false,
  "language ": "en ",
  "responseTime ":0,
  "originLevel1 ": "CoveoSearch ",
  "originLevel2 ": "_524BC2CF-1942-42EA-A236-6AE80E3B7596 ",
  "originLevel3 ": "/sitecore/content/Home/CoveoSearch ",
  "customData ":{ "documentURL ": "/en/Team/Mike-Casey ", "documentTitle ": "Mike Casey ", "JSUIVersion ": "1.1276.20;1.1276.20 "},
  "userAgent ": "Mozilla/5.0 (Windows NT 10.0; WOW64) AppleWebKit/537.36 (KHTML, like Gecko) Chrome/55.0.2883.87 Safari/537.36 ",
  "searchQueryUid ": "938f1d27-6b40-4fef-add2-e31035ee7e43 ",
  "queryPipeline ": "Launch Sitecore ",
  "documentUri ": "sitecore://database/web/ItemId/A410F42C-903A-4D73-AF5C-F13313EA1BF2/Language/en/Version/1 ",
  "documentUriHash ": "WñOHY1H6vY78EOñH ",
  "documentUrl ": "/en/Team/Mike-Casey ",
  "documentTitle ": "Mike Casey ",
  "collectionName ": "default ",
  "sourceName ": "Coveo_web_index",
  "documentPosition ":1,
  "viewMethod ": "documentOpen "
}
The payload above shows a click event on the “Mike Casey” document from the “CoveoSearch” interface. As you can see, there is a lot more to it, and you can expand it if needed. I will be covering this subject in a bit.
From the Coveo Cloud Usage Analytics perspective, the actionCause is categorized in one of the three Event Causes: Search, Click, and Custom.
In the example above, documentOpen is a Click event. The rest of the metadata will be used to document the event.
From a user perspective, the metadata can be extracted in the Coveo Cloud platform. The metadata will be called API Name and can be combined with an Event Cause to create a Dimension.
In other words, a Dimension is metadata (extracted through an API Name) in the context of one or more Event causes. This might be a bit confusing so far, but you can refer to this table for more details.
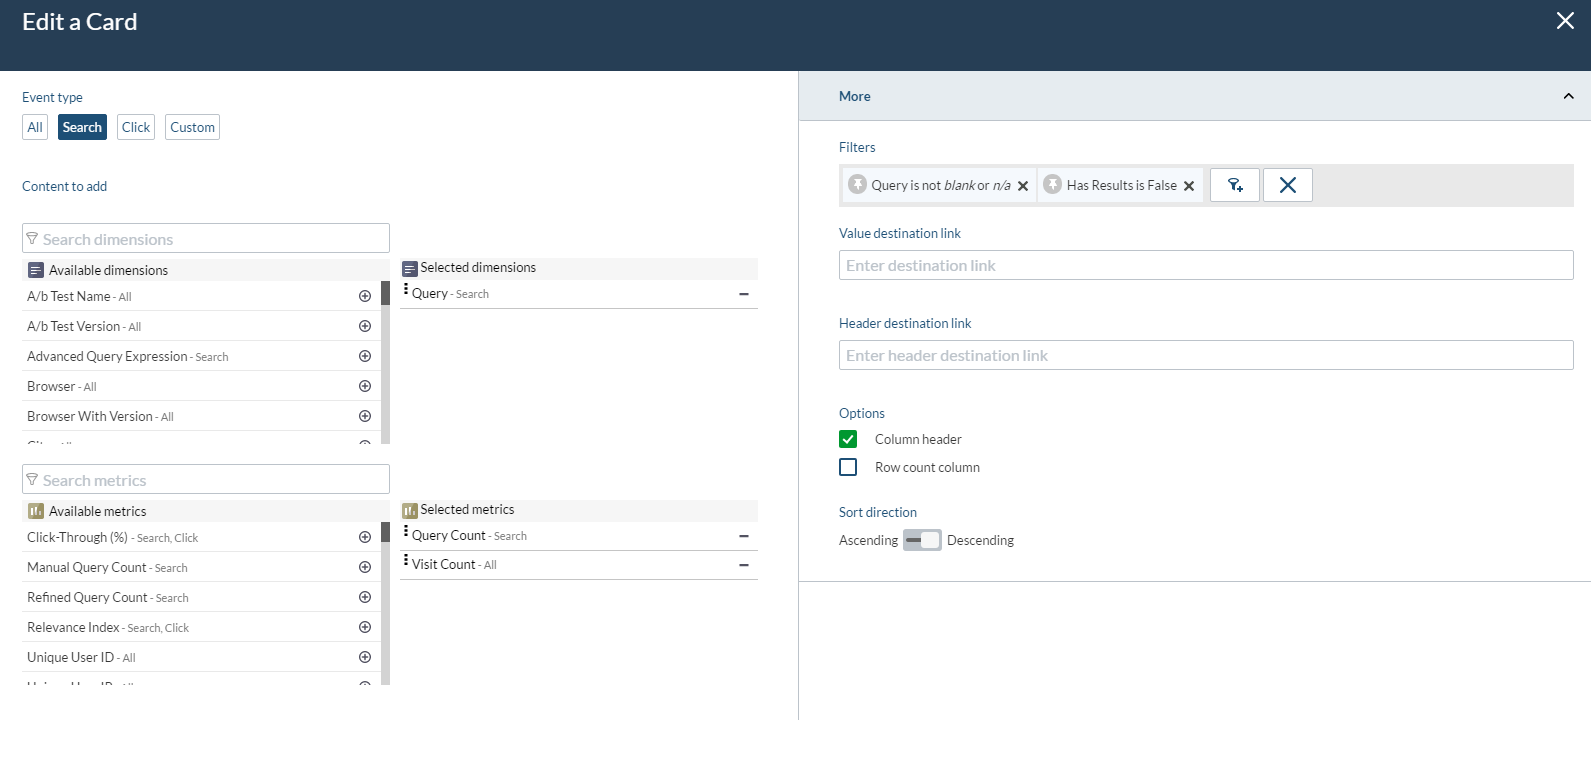
Let’s say I want to identify my queries without results. I will be using dimensions, metrics, and filters.
My dimension will be Query, which is defined in the Dimensions menu as a Search event using a queryExpression Api Name.
The metrics will be Query Count and Visit Count, which is the number of times the query was executed and the number of unique visits related to this query.
Finally, the filter Has Results is false is added on the card to show only queries without results.
With these basic principles in mind, it will be easier to understand the remaining best practices regarding Analytics.
14. Slice-and-dice by attribute
The example in the last section used dimensions, metrics, and filters. By combining the three together, you have a rich toolbox which can be used to visualize everything happening with search on your site.
Before we see how to extend this with custom events and metadata, the first thing you should do is to separate your search components in different reports.
In the analytics event payload, you can see the origin key:
"originLevel1 ": "CoveoSearch "
Coveo for Sitecore uses the name of the page hosting the Coveo Search View component when setting the origin key. In my case, CoveoSearch is the name of my search result page item.
So to have different origins for each of your search driven pages, you simply need to name them differently in Sitecore.
Now that you understand how to set the originLevel1, you can use it in multiple ways.
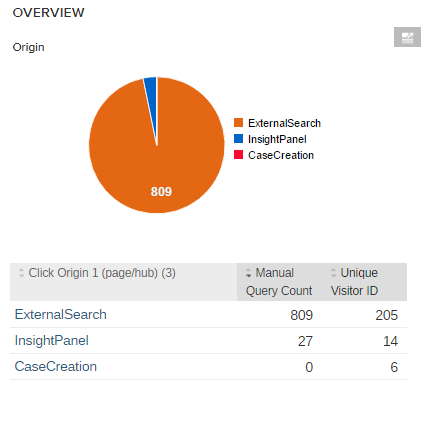
As I mentioned earlier, you could combine the originLevel1 dimension with the Query Count metric to create a simple table or pie chart showing the number of queries per origin.
You can also use the origin as a filter on your table, which would allow you to combine several dimensions under the same filter. This filter can be added at the card level, like my previous example with the content gap table, or you can set it at the report level to have multiple cards and tabs affected by the filter.
The originLevel2 is the ID of the current tab. If you do not have a tab component on your page, then the value will be default.
The standalone global search box, which was the subject of the first part of this series of post, will not log any data in the originLevel1, since it simply redirects the query without sending an analytics payload.
Instead, it will be logged in the originLevel3 sent by the search component it redirects to. In short, the originLevel3 is the referrer.
Although the origin is a very useful dimension, it is only one amongst many offered out of the box. You could use the same logic with the Device Category dimension to show only mobile users, or the City and Country dimensions for geographical mapping. You can also create your own dimension, which I will explain in the next section.
15. Track every search experience
By now you should have an idea on how to use the data sent to the Coveo Cloud Usage Analytics platform. With this information in hand, you might want to start sending more complex data , such as the item(s) in a visitor’s cart or if the visitor is a specific type or account like a partner or a premium user.
Metadata can be added directly on the properties of the Coveo Search View rendering. However, this set of metadata will be static. Since the items in a cart can always change, you will need your set of metadata to be dynamic.
My favorite approach is to send the metadata programmatically by adding the key value directly to the analyticsCustomMetadata option of the component.
In the first part of this series, I explained how to retrieve and extend the options of a Coveo component.
You can use the same logic for custom analytics metadata, so if you want to send the item(s) in the cart of your site visitor, you could do something like this:
var cartItems = // Code to retrieve the items in the cart of the user.
CoveoForSitecore.componentsOptions.analyticsCustomMetadata["cartItems"] = cartItems;
The code above will add additional metadata to all the events happening on the page, but you might want to create your own events. The Coveo JavaScript Framework offers several functions to send Search, Click, or Custom events. For example, you might have an “Add to Cart” button directly in the Search Result page or on a listing page; here is an example on how to send analytics data for this type of event:
document.getElementById('IdOfCartButton').onclick = function(e){
    var customEventCause = {name: 'Add To Cart', type:'Purchase'};
    // The metadata is optional, since the logCustomEvent function will already contain the metadata of the page, use it to expand the payload with data related to this event.
    var metadata = {key: "value"};
    Coveo.$('#<%= Model.Id %>').coveo('logCustomEvent', customEventCause, metadata);
}
Now that you know how to add metadata to existing events and create custom events, you might want to track events outside of a search driven component. You may think that tracking the rest of the solution is out of the scope of your search solution and you are not entirely wrong. However, sending the entire user journey to the Coveo Machine Learning engine will allow you to use the Recommendation Feature.
To track page visits, simply add the Coveo Page Views Analytics View rendering on each pages you want to track. Alternatively, you could reference the rendering directly in the layout of your pages the same way you added the global search box in the first part of this series.
You can find a detailed guide for the Page Views Analytics component here.
15.1 Context
Additionally, it is highly recommended to send context to the Coveo Recommendation engine. The context helps Coveo segment the users’ visits in order to provide items relevant to them. To do so, simply integrate the User Context component after the Page Views Analytics on all pages you wish to track. The component will give you a few context options by default such as the user xDB pattern card. If needed, you can add to these options using the UserContextPipeline.
Keep in mind that sending a large amount of context can reduce the efficiency of the Coveo Recommendation engine. I would suggest to send no more than 5 different context information.
In parallel to all of the above, you can send analytics data to the Sitecore Analytics API. I will not explain it in details since the underlying logic is the same as with the Coveo Usage Analytics, and it is well documented here.
16. Map Search Activities to KPIs
We saw previously several ways to track everything happening on your search driven components. The next step is to use this data in a Coveo Cloud Usage Analytics report.
Back to the “Add to Cart” example:
document.getElementById('IdOfCartButton').onclick = function(e){
    var customEventCause = {name: 'Add To Cart', type:'Purchase'};
    var metadata = {product: {code to retrieve the name of the selected product}};
    Coveo.$('#<%= Model.Id %>').coveo('logCustomEvent', customEventCause, metadata);
}
The value of the name key will be added to the Event Value dimension, and the value of the type key to the Event Type dimension.
I used “Purchase” as a type since I will most likely send several events which will all fit in this “Purchase” workflow. For example, in order to fully map the journey of my users, I could also send an event for:
- Remove from cart.
- Add to wish list.
- Remove from wish list.
- Navigate to cart.
These events could all fit in the “Purchase” Event Type dimension.
As for the metadata, I will send the product name based on any logic to retrieve it from the DOM.
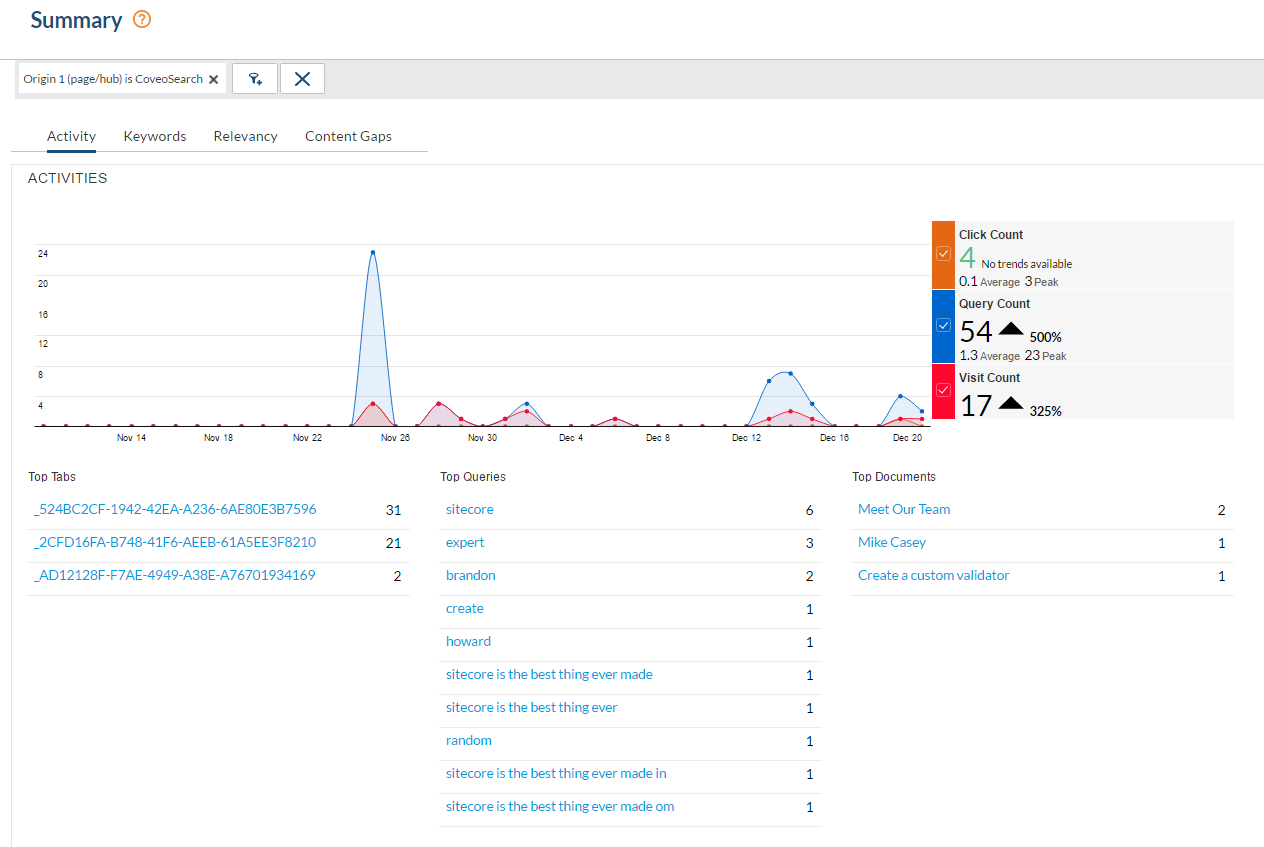
Once these events are added in the code of your page, you will be able to create reports and dashboards based on them. Here is an example:
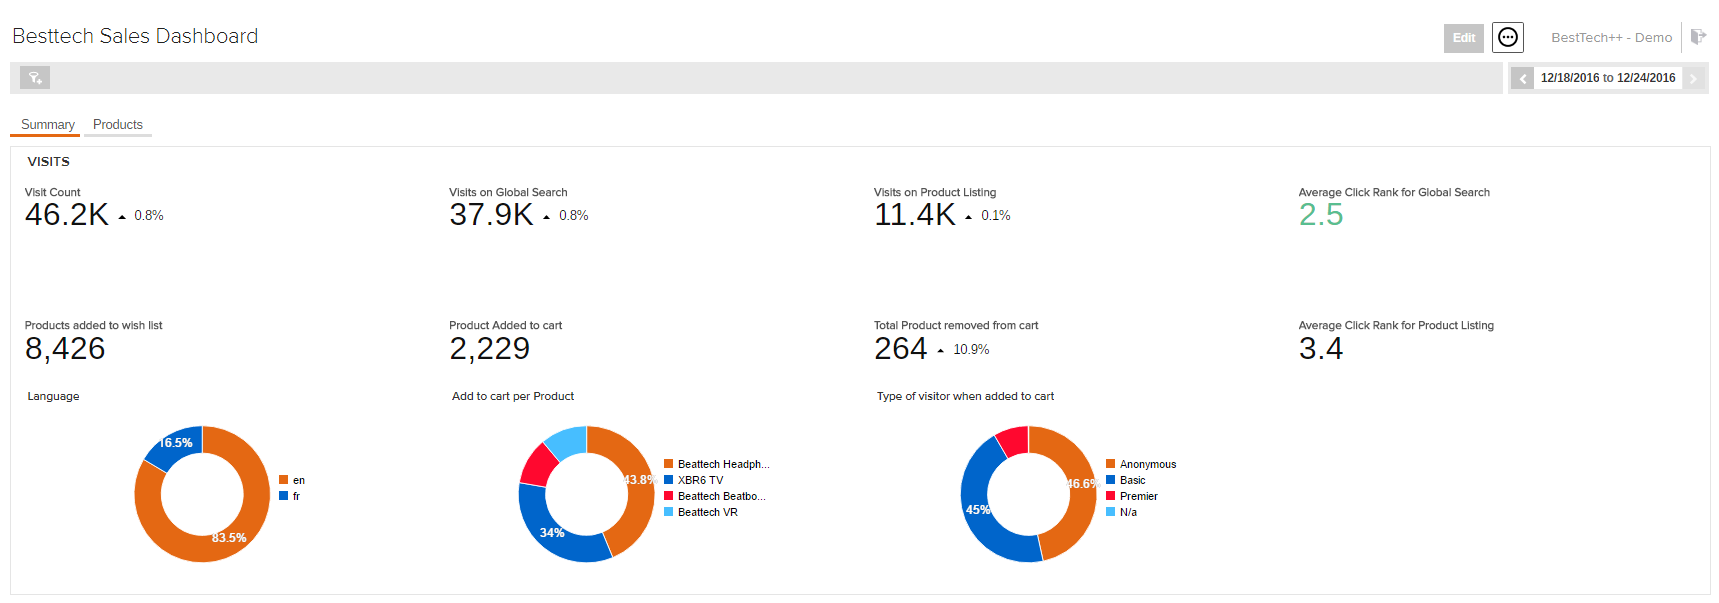
On that first tab, you can see the “Product Added to Cart” card which is simply using the Visit Count metric combined with a filter on the “Add To Cart” Event Value dimension:
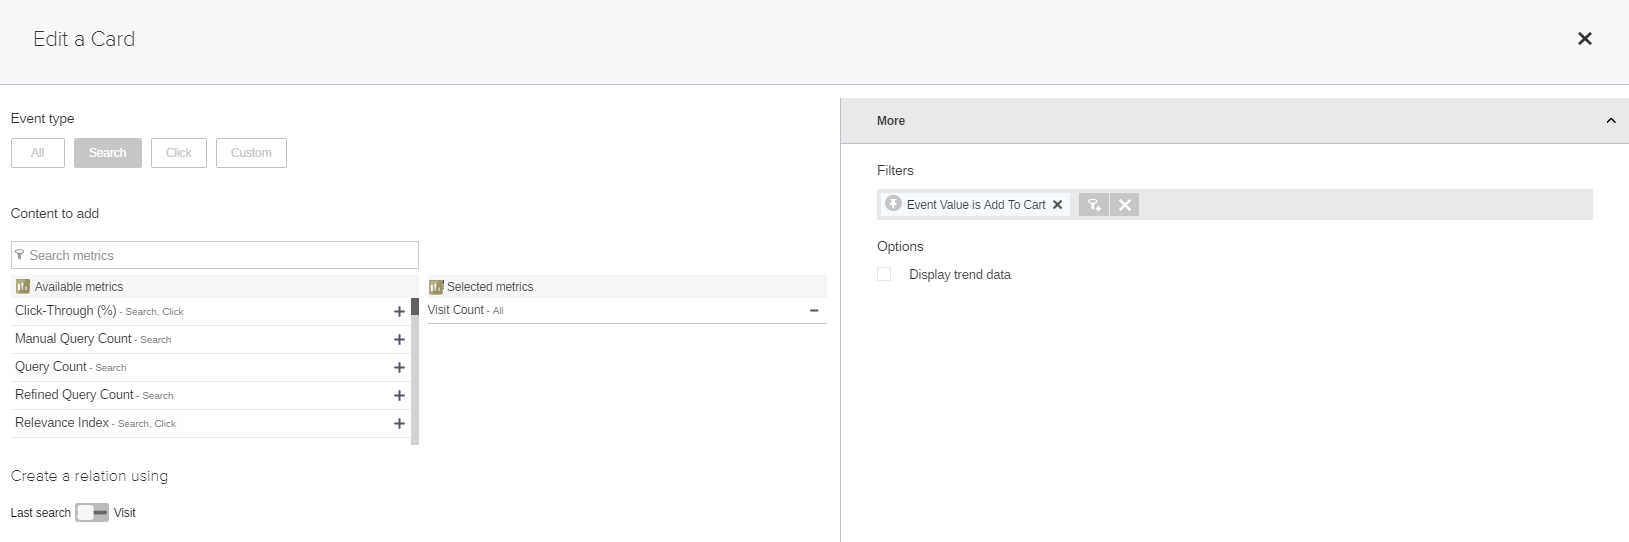
The dashboard also shows a few additional metadata such as who the visitors are.
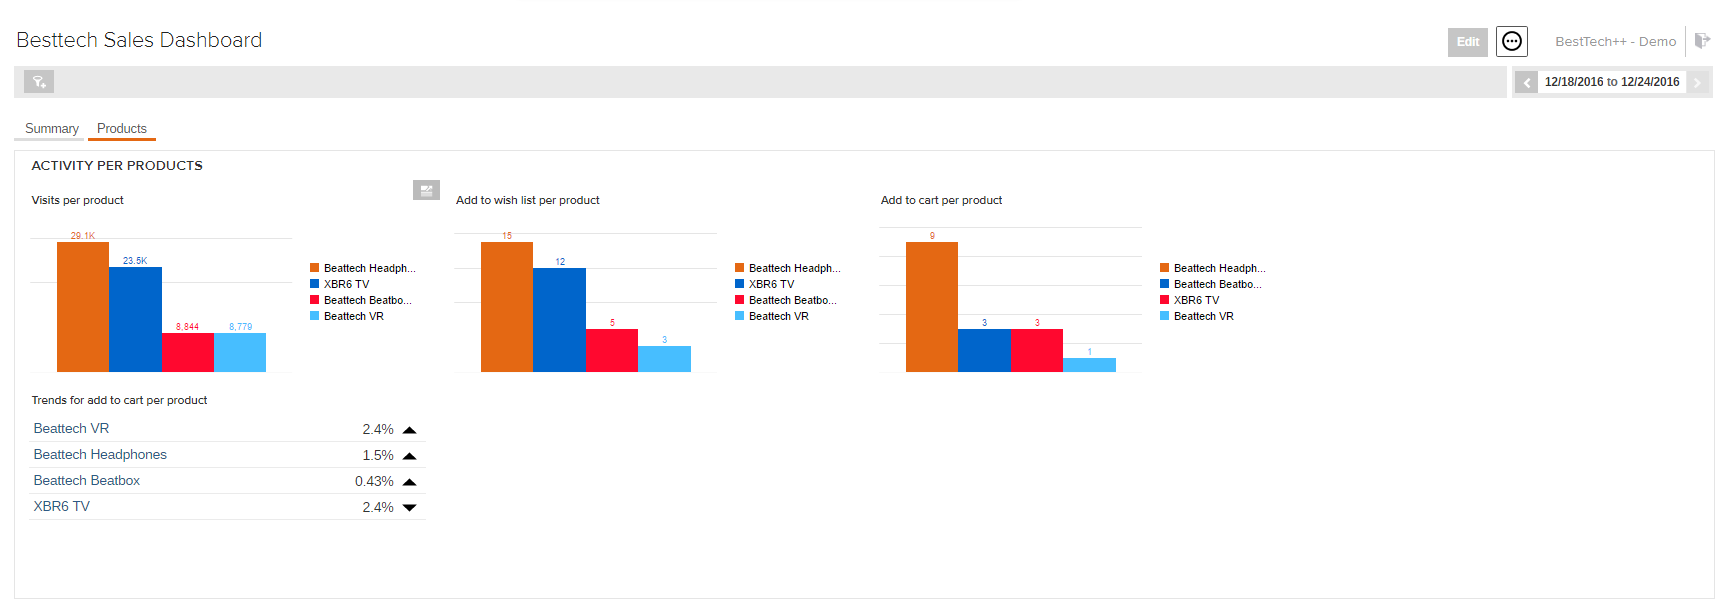
On the second tab, you can see the same data by product:
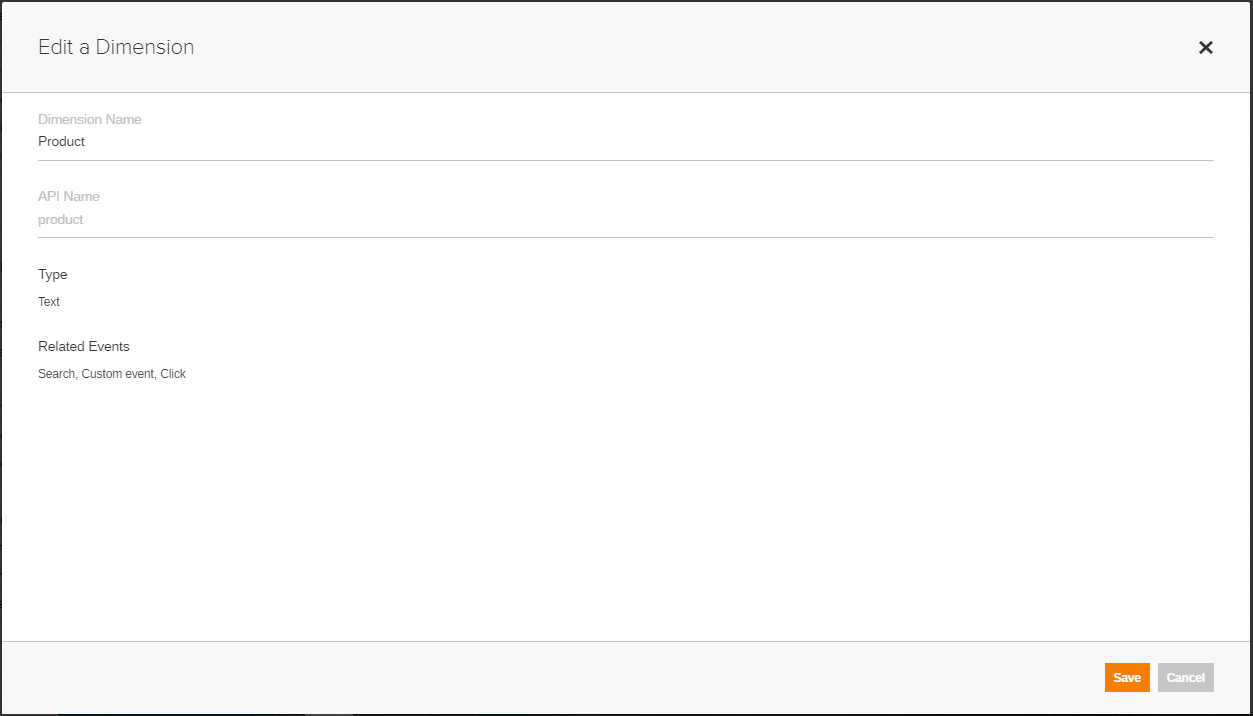
To show this, you need to create a “Product” dimension based on the metadata sent previously:
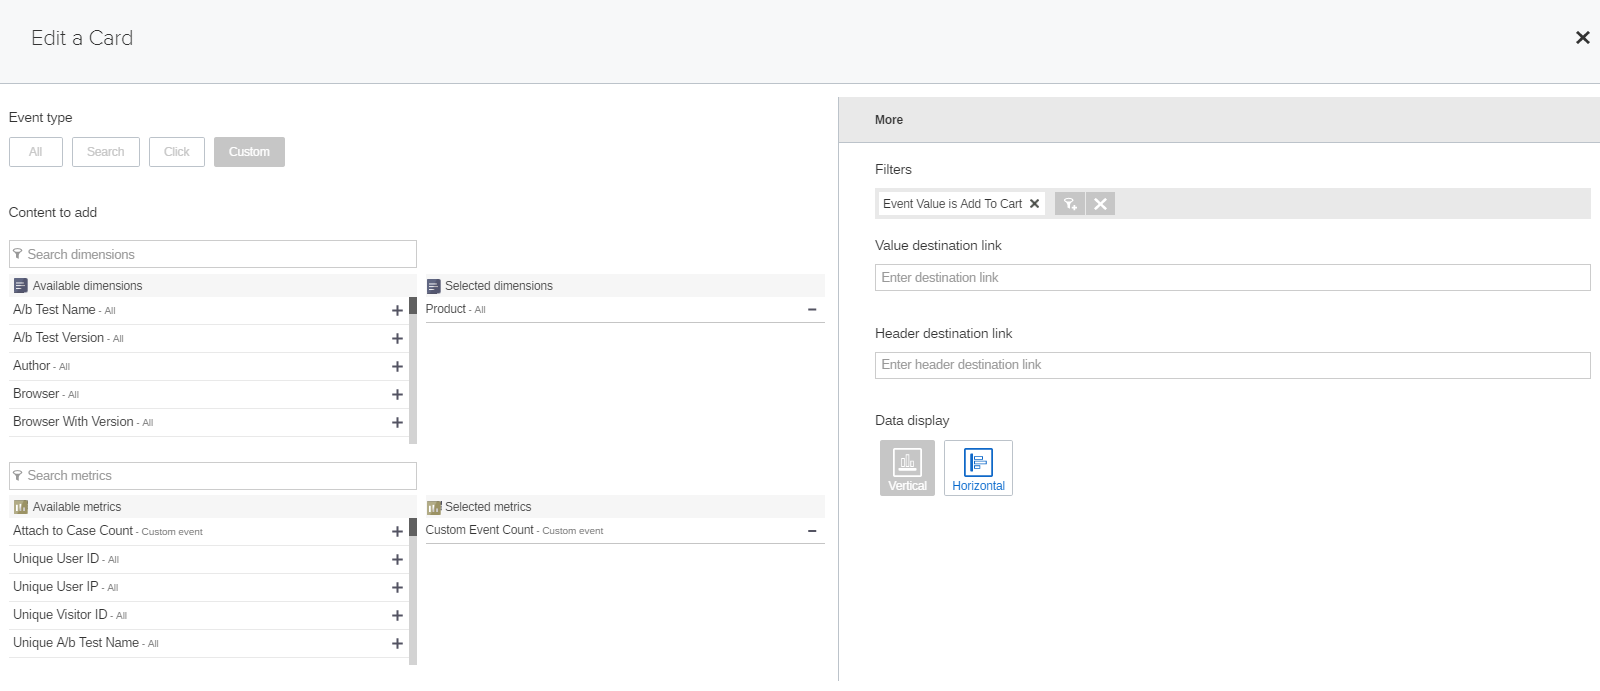
Then the “Add to cart per product” card is based on both the “Product” dimension created by the metadata and the “Add To Cart” filter tied to the custom event:
From a business perspective, this dashboard shows that the “Beattech Beatbox” is often added to wish lists, but not to cart. You might use this information to launch a special discount to invite your visitors to move this item from the wish list to the cart.
17. 18. 19. Curate your content, your experience, and focus on the data
The last three topics are business decisions that every organization must make when it comes to search, relevance, site navigation, and content management.
I do not have a step by step solution to curate your content or improve your experience. But if you follow the 16 first best practices, you will have the right tools to help you in that task.
Sitecore gives you the opportuniy to improve the content and the experience over the years, as opposed to a fully custom web application or a standard CMS without the anaylics and marketing suite offered by the XP platform. Coveo, from a search perspective, allows you to do the same with the search and relevance aspect of your solution.
Start simple and make sure you track everything happening on your search driven pages. Keep your eyes on your analytics and learn about your users before trying to categorize them. If you keep that in mind, you will be well on your way toward success.
I would be happy to discuss more on this topic on Sitecore Stack Exchange, Twitter, or at one of the Sitecore User Group.
Good coding!