Coveo for Sitecore has been out for a few months now and we had to rethink the way we index search and of course, for us, support and maintenance people, the way we tackle the issues popping here and there.
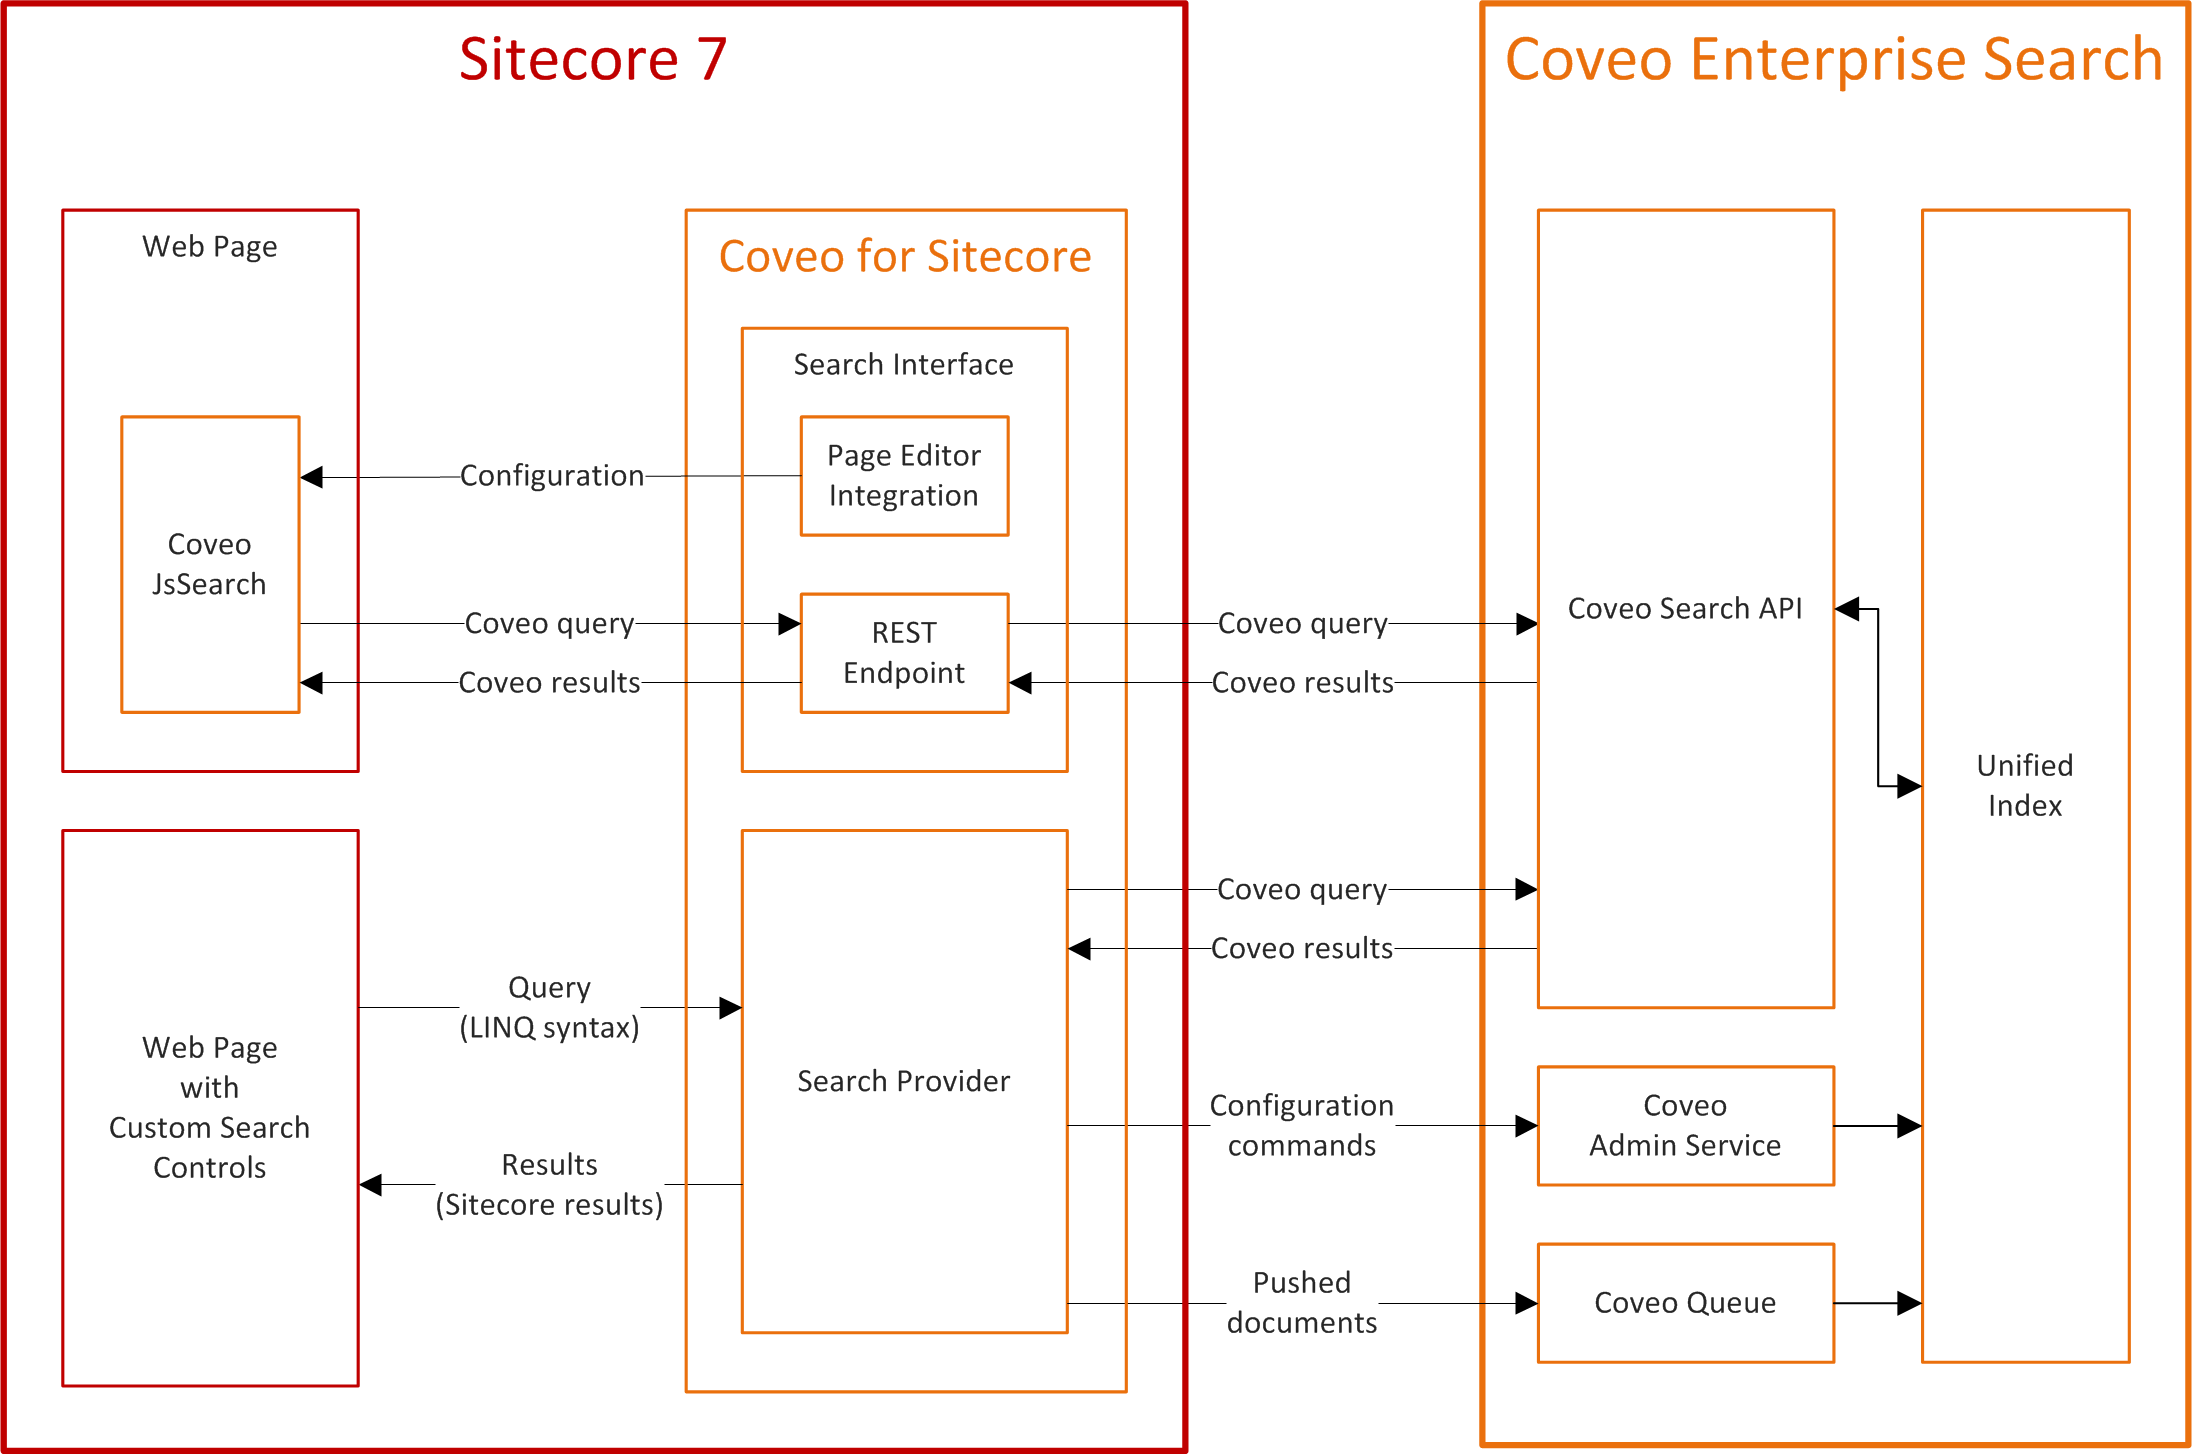
Our Search Provider implementation pushes documents to RabbitMQ, which keeps them warm until Coveo picks them up for indexing. The configuration is set in the Coveo.SearchProvider.config file and is also being synchronised with the indexing back-end through the Coveo Admin Service. The schema below is from the Coveo Online Help, for now I will only address the Search Provider part.

The process is simpler than before but the troubleshooting will require a change of mindset.
IMPORTANT: The CES Console is your dear friend for all your Coveo operations. This is still the case with Coveo for Sitecore. The first step before starting any type of troubleshooting is to arm yourself with that friendly tool. Be aware that you can filter by source or system events.
NEW STUFF: For all of you using June 2014’s release or newer, the R&D team added a built-in Coveo Diagnostic Page. I will not lie, this is one of my favorite new feature.
The new process and where you should look first when something is wrong
Sitecore
1. Admin service issue.
The first blocking issue you could meet is directly in the Sitecore Indexing Manager. As I mentioned before, the Coveo Admin Service is the messenger for configuration-related calls, which means that it is also the first component of the chain that can fail. The Coveo for Sitecore diagnostic page should also tell you if anything is not running properly. If you do not have it, you will see the service state in the Windows Services, where it can be stopped or started. You can also access it directly through your browser using http://localhost/AdminService or http://localhost/AdminService?wsdl.
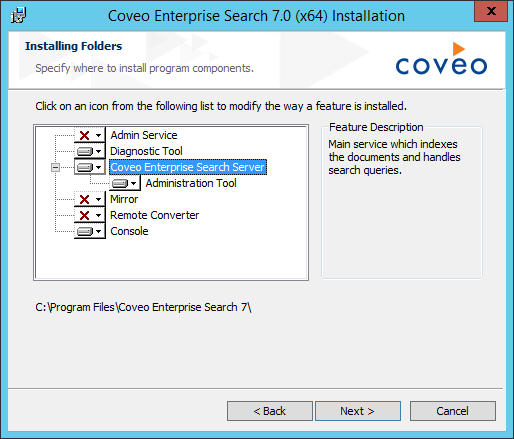
Now, what can go wrong with it? Well if you are using Coveo for Sitecore with a Coveo instance that you have been using with other connectors, you might have not installed the Coveo Admin Service in the first place. It is not installed by default with the Coveo Enterprise Search Installation Wizard, you need to choose the Custom Install path and make sure that it is selected.

The other common issue is with the https certificate. If you are using a restrictive certificate imposing an instance name, then the default local host will not pass the validation step. Simply change the <AdminServiceUri> value from localhost/AdminService to [qualified name]/AdminService in the Coveo.SearchProvider.config.
Finally, you must leave some breathing space for the service, so do not forget to enable port 80 or 443 depending on the security of your service. The ports can be managed in the Coveo.CES.AdminService.exe.config file located by default under C:\Program Files\Coveo Enterprise Search 7\Bin\AdminServiceSecurity. An issue with the Admin Service could return this type of error in the Sitecore Indexing manager:
System.ServiceModel.EndpointNotFoundException: There was no endpoint listening at http://127.0.0.1/AdminService that could accept the message.
NOTE: The Coveo Admin Service has its own logging stored by default under C:\Program\ Files\Coveo Enterprise Search 7\Bin
2. Version mismatch issue.
This is a common one and you can easily make a mistake. Even for minor upgrades, an installation of both the CES instance and the Coveo for Sitecore package, including the Search Provider and Search Interface, needs to be performed. A failure to do so might produce several errors at indexing and querying time. One of the most common error would be a “method not found” exceptions. To double check your versions, use the property options on the Coveo DLLs in the bin folder of your Sitecore. Consult the Coveo Online Help for more information on both the Coveo Enterprise Search 7 and Coveo For Sitecore versions.
3. Duplicate Key Exception.
This is a hidden issue fixed in July 2014’s version of Coveo for Sitecore. The Coveo Admin Service will not be able to create a new Security Provider if an old User Identity is already active. If the indexing manager fails with the following Exception:
Fail to add security provider “Security Provider” on source …
then simply navigate to the Coveo Administration Tool under the Configuration >> Security tab. Choose the User Identity menu and delete any User identity with the following name: Sitecore Admin for [Your instance name].
4. QueueURI invalid.
Not much to say on this one, the QueueURI is set in the Coveo.SearchProvider.config file.
Make sure that it is matching the one set in the RabbitMQ Management page. See the RabbitMQ section below for more details on how to reach this page. If the QueueURI is not set properly, you will most likely hit this error while indexing:
RabbitMQ.Client.Exceptions.BrokerUnreachableException: “None of the specified endpoints were reachable.”
TIP: Sitecore produces an enormous amount of logging but everything related to the Coveo Search Provider at the Sitecore level can be found in the logs with the following naming convention: log[timestamp].txt. It is with all the other logs in the Data/logs folder of your Sitecore instance. No need to look in the Coveo file system until now.
IMPORTANT: Closing the dialog window will not stop the indexing process. The only way to force Sitecore to stop is through a recycle/reset in IIS.
WARNING: Depending on how you customize your Coveo for Sitecore, you might play around the config files under the App_Config folder of your Sitecore instance. Do remember that Sitecore reads EVERY file with the .config extension. So if you are to keep a few files as backup, keep in mind that you should use .config.backup and not .backup.config as an extension. It is common Sitecore knowledge but since a mistake is easily made, I prefer to mention it here. Remember that Sitecore does provide you with a merge of all the config file in the Show Config page: http://[sitecoreinstance]/sitecore/admin/showconfig.aspx
Coveo
1. Live monitoring stopped.
As I mentioned before, the new Coveo for Sitecore integration has the “Everything is done in Sitecore” mindset. 95% of the time, you will be conducting publishing, indexing and even troubleshooting operations only in Sitecore. Still, if the indexing is working properly in Sitecore but the CES Console is not logging any activity, then you might want to take a look at the Coveo Administration Tools. Under the Index >> Sources and Collections tab, you will find the Sitecore Search Provider collection with the sources corresponding to the database name set in your Coveo.SearchProvider.config.
NOTE: Adding databases or changing source name for scaling scenarios is described in further details in our Scaling Guide.
There is no point on trying to rebuild or refresh manually these sources, they are plugged to the search provider and are commanded under the cover by the Sitecore Indexing Manager. What you can do however, is the good old “turn it off and on again” that the IT world has been relying on since the beginning of the computer era. To do so here, click on one of the sources, it will lead you to the source status page. From there, you will be able to disable and re-enable the live-monitoring operation. Keep an eye on the CES Console since it will tell you straight away (and in bright red) if anything is wrong. You can also use the check boxes to select multiple sources and use the drop-down box to disable and enable live monitoring. Most of the time, this will resume the indexing operation.
2. The security provider handbrake.
The security provider is now created automatically by the Admin service, thus reducing the configuration errors which were frequents with earlier connectors. Still, a downed Sitecore can prevent the security provider to load properly, triggering an handbrake on the indexing operation. Usually, Coveo will be nice enough to warn you with the following message on the status page of the Coveo Administration Tools:
A security provider is not properly configured.
Simply navigate to your Sitecore Security Provider under the Configuration >> Security tab and reload it by clicking on Accept Changes at the bottom of the page. Once it is done, simply disable and enable the live monitoring operation on the source and you should be good to go.
3. QueueURI invalid part 2.
There are two locations where you can set the QueueURI, the Coveo.SearchProvider.config file and the Coveo Administration Tool. As I mentioned before, an invalid QueueUri in the .config file will break the indexing process in Sitecore. Same goes on Coveo side but it can be harder to spot and if it is not fixed quickly, it could end up filling the Queue, and your disk at the same time.
The QueueURI is defined in the source’s general properties under the Index >> Sources and Collections tab. It is set automatically by the Admin Service when you first perform a rebuild in Sitecore, so a mismatch is not a common error but it is worth keeping it as a reminder in your troubleshooting guide. If you have to change it, do not forget to accept the changes at the bottom of the page.
RabbitMQ
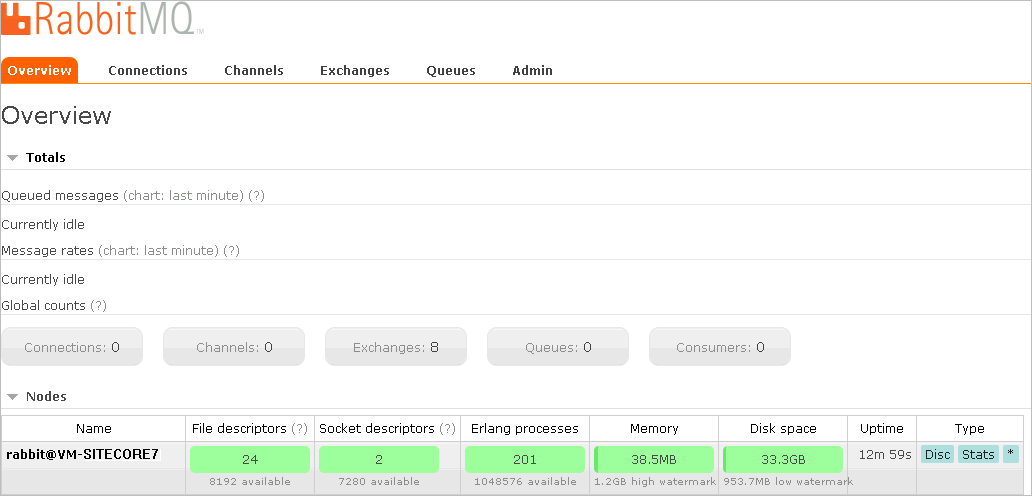
The newest fluffy addition to the Coveo and Sitecore relationship is RabbitMQ. The default access point of the management is http://localhost:15672/ and the username and password are guest/guest. RabbitMQ will give you a simple and user friendly overview of the current crawling operation. While rebuilding, an empty queue will be a clear sign that nothing left Sitecore, while a full and idle queue will reveal a Coveo issue.

WARNING: If you ran several indexing operations that are not being picked up by Coveo or you changed the source name multiple times, the documents will not be automatically cleared from the Queue. This could end up filling up the drive on which your RabbitMQ is installed. By clicking on the Queue, you will be able to Delete or Purge it. We don’t recommend to use the purge unless the Queue is not used anymore, in case of a source name change for example.
LAST TIP: Coveo supports log4net, do not hesitate to use it!
