For those of you who missed part 1, this series of blogs is to provide technical details on each of the best practices mentioned in the Best Practices for Site Search eBook.
The Search Result Page

My first post was mostly about the standalone search box. It can get confusing since the search result page also contains its own search box. In technical term, the Coveo Search View rendering is a search result which contains a result template and several placeholders for sub-components such as facets, sorts, related queries, recommendations, tabs and more. If you followed my first set of best practices, chances are that the search interface search box is hidden, and the standalone search box is driving your search result page.
6. Make your search results “human friendly”
Focus on the result
Be careful with the size of the headers and banners on your search result page. You must keep the focus (the center of the screen) on the results and keep in mind that a page refresh will most likely send the user back to the top of the page. Having to scroll back down is a hit on the experience so keeping an anchor in the search results is the way to go. For more details, visit this forum post.
Limit the number of facets
Facets have a dependsOn option which you can use to only show a facet when it becomes relevant. The basic example is Years and Months. You will want the users to select the year before selecting the month. You can also use the Hierarchical Facet component to encapsulate facets, but it can quickly increase the complexity of your field management.
If you have some type of “master” facet, which is used for a parent category (product vs support knowledge base for example), you might want to convert them to tabs instead. You can restrict the facets to be shown on each tabs, which is a great way to reduce the overall amount of facets.
Keep in mind that every facet click is tracked by Coveo Usage Analytics, which means that you can easily track the usage of your facets and remove the ones rarely used. Here is a example of two cards to mesure facet performance:
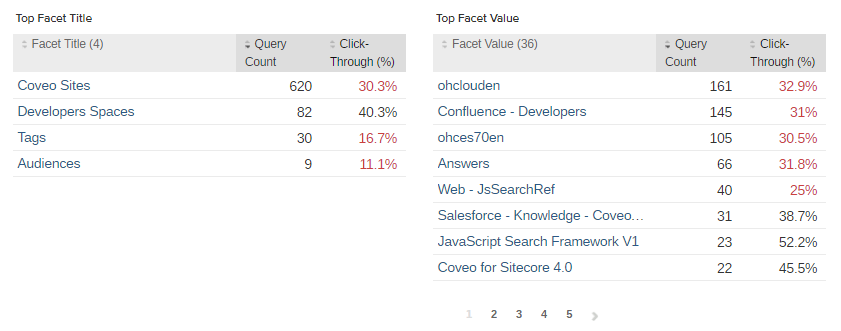
The Facet Title and Facet Value columns are dimensions, while the Query Count and Click-Through columns are metrics. The Query Count shows the number of time this facet was selected, while the Click-Through shows the ratio between the facet selection and the result click. In other words, if I select a facet and click on a result, my Click-Through is 100%; if I click on no results, then it would be at 0%. A facet with a low Click-Through should be removed, since it is mostly leading your users to a cul-de-sac.
If you do not know what are dimensions and metrics, please refer to this guide. I will cover this topic in the last blog of this series.
Be sparing with mobile facets
Since September 2016’s version, the Coveo JavaScript framework will place all the facets in a container when the screen size is reduced. So if you are using an older version, an upgrade could improve your mobile experience without the need to code anything. Still, reducing the number of facets when moving to mobile can be a good idea, especially if you have a lot of them.
Same as I said before, Coveo Usage Analytics can give you hints on what to keep and remove. You can add the device category dimension as a filter on your dashboards to only show data from users on mobile devices.
Now that you know what to remove, you have several options, here are the two most popular:
- Assign a different rendering on the mobile device of your search page item which contains only a limited number of facets.
- Hide the facet using the disable method of the component based on the width of the screen. Here is an example with a media query:
Coveo.$('#@Model.Id')
  // You need to call this event on the newQuery event since you want to make sure that the facet component exists, but has not yet launched the query to retrieve it's values.
  .on(Coveo.QueryEvents.newQuery, function(e, args) {
    // Example of width, replace it by the value you prefer.
    var mq = window.matchMedia( "(min-width: 600px)" );

    if (mq.matches) {
      Coveo.get({the DOM id of the facet}).enable();
    } else {
      Coveo.get({the DOM id of the facet}).disable();
    }
  })
  // Then resume the initialization.
  .coveoForSitecore('init', CoveoForSitecore.componentsOptions);
The advantage of the first approach is to be able to manage everything through the presentation details of your items, without a need to play with the code. I personnaly prefer the second approach however, since the trend in web design is to have fully responsive pages, not seperate presentations. Also, managing a single device simplifies cuztomization and maintenance in the long run.
Be flexible when it comes to language
Several languages are supported by the Coveo index, you can see the full list here.
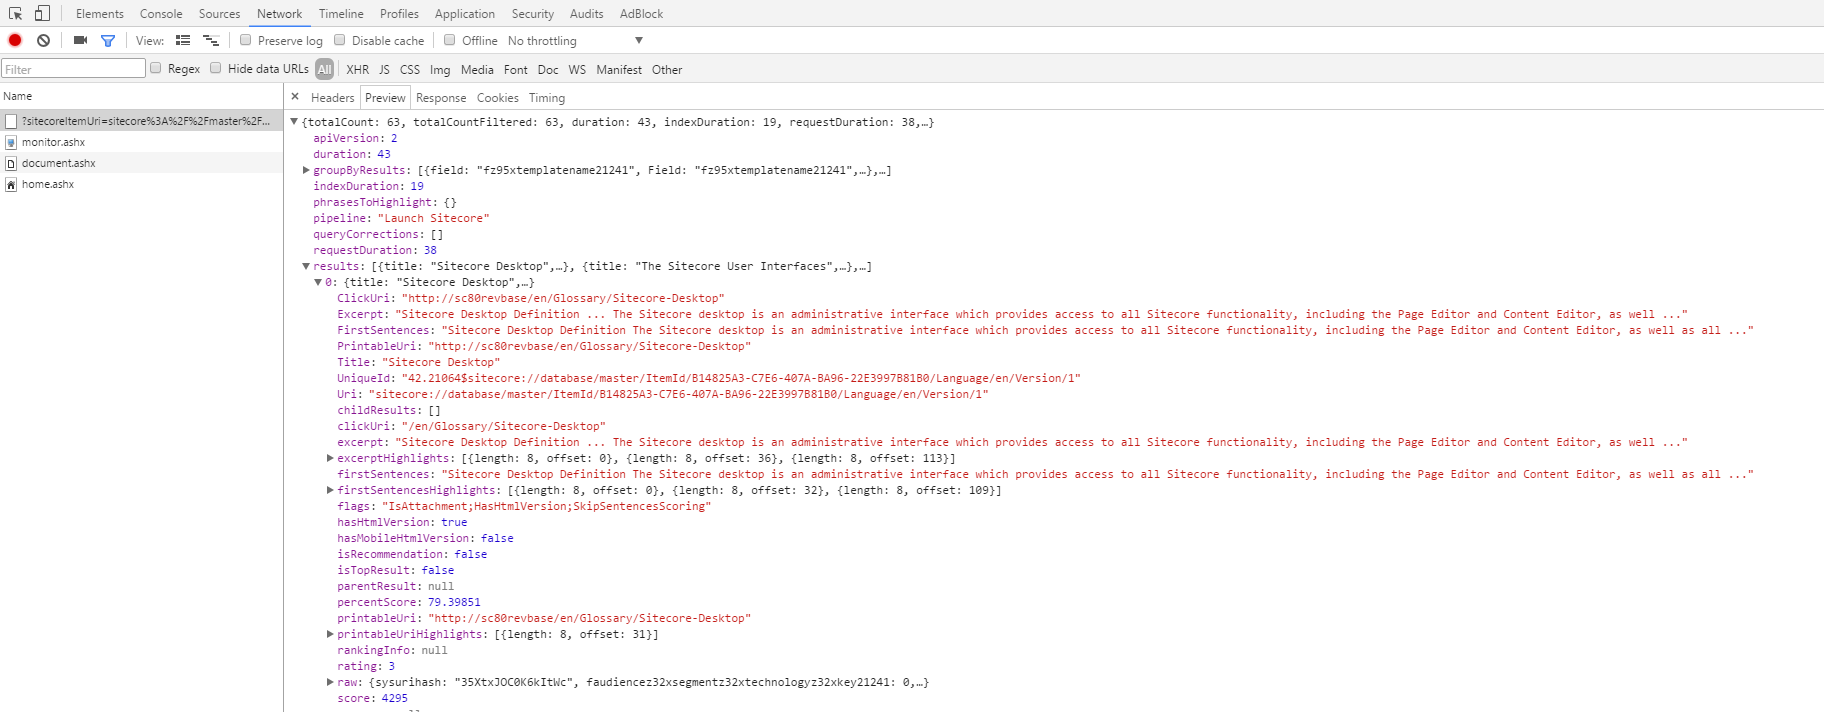
By default, the Coveo Search View rendering will have a “Filter results on the current context language” property enabled. You can simply uncheck it to have a multi-language search page. This logic is based on the language version of the search page item. An English version item will have a filter on the “en” language which can be seen in the network tab of most browsers’ developer tools:
cq: @fz95xlanguage11111=="en"
The language version of the item will also decide which culture to be loaded. You can see this logic in the SearchView.cshtml file:
<script type="text/javascript" src="/Coveo/js/cultures/@(Model.CultureName).js"></script>
Like for every other Coveo for Sitecore file, never modify the culture files in the /Coveo/js folder since it will be overwritten in the next upgrade.
The best practice eBook recommends to be aware of business jargon within the same language. The Thesaurus is your best ally for this kind of work, but it stays a manual approach. Tackling every single variant of a word can become an arduous task, which can be near impossible for some businesses. The best strategy is to use the Coveo Usage Analytics to quickly identify and solve the most common mistakes.
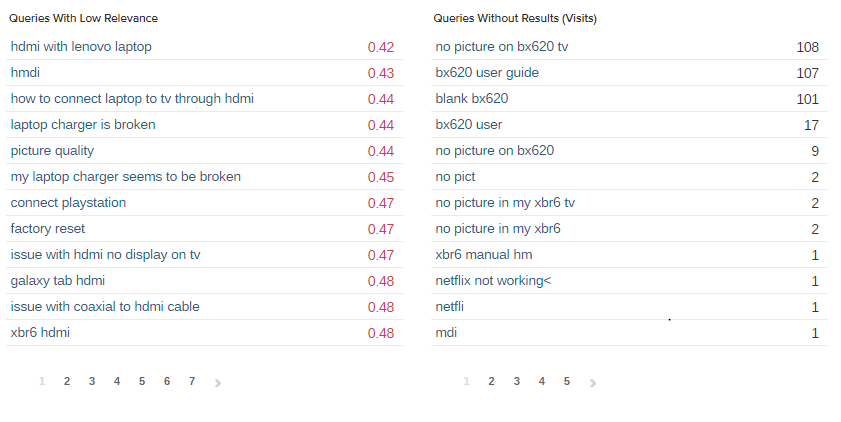
In the screenshot above, I created a few cards which uses the Query dimension combined with the Relevance Index metric for the first card and the Visit Count metric for the second one. The Relevance index is a mix of result position and frequency of query, the full equation can be found here. The Visit Count metric will only tell you how many visitors tried that query. To make sure that I am only seeing queries without results, I used the HasResult = False filter on that same card. These two cards will give you a list of your problematic queries, on which you can spend most of your manual efforts.
If you have a Coveo Cloud index, then Coveo Automatic Relevance Tuning (ART) will do the work for you; simply create the model and then sit back and relax.
Sort results for relevance by default
This is already the default behavior using our Coveo Search View rendering, so I don’t have too much to add. Here are some useful links about sorting, use them wisely!
Understanding the code of a sort component
Also take note that both the Coveo Search View and the Coveo Tab View renderings have a default sort property which can be changed.
Different result type, different result look
Coveo for Sitecore leverages underscore.js templating engine to render the result list on the search result page. When the page loads, the result list will load the default template declared in the SearchView.cshtml:
<script class="result-template" type="text/underscore">
   <!-- HTML -->
</script>
Changing anything in-between these tags will change the look and feel of your result list. Now before I go further, let’s make sure we are on the same page regarding underscore.js templating.
In your HTML, you can use special sets of delimiters to indicate to the underscore.js framework that you are inserting dynamic presentation logic.
The delimiters would be <% %> by default, but the framework also supports {{ }}. This is what Coveo for Sitecore will use in order to avoid conflict with ASP.NET.
This said, you can use the delimiters for three different operations:
- Evaluate :
{{ }}- To insert any type of code such as variable declarations, loops, conditions, etc. - Extrapolate :
{{= }}- To insert any element from the response of the index. - Escape :
{{- }}- To insert any element from the response of the index using HTML escaping.
For more details on these operations, read this help page.
As you may have figured out already, the response of the index can be seen directly in the browser developer tools or in any web debugging tools.
Now back to the result template, here is an example for a Sitecore template called Team Members:
<script id="team-member-result-template" class="result-template" type="text/underscore" data-condition='raw.@(Model.ToCoveoFieldName("_templatename", false)) == "Team Member"'>
  <div class="coveo-result-frame">
    <div class="coveo-result-row">
        <!-- Custom thumbnails using the image computed field. -->
        <div class="coveo-result-cell" style="width:85px;text-align:center;padding-top:7px;">
          {{ var imageUrl = raw.@(Model.ToCoveoFieldName("imageurl", false)) || raw.@(Model.ToCoveoFieldName("iconurl", false)) }}
          {{ var imageAlt = raw.@(Model.ToCoveoFieldName("imagealt", false)) || raw.@(Model.ToCoveoFieldName("iconalt", false)) || "" }}
          <span class="coveo-icon">{{= image(imageUrl, { alt: imageAlt, width: "85px", height: "85px" }) }}</span>
        </div>
        <div class="coveo-result-cell" style="padding-left:15px;">
          <div class="coveo-result-row">
            <div class="coveo-result-cell" style="font-size:18px;">
              <div class='coveo-title'>
                <!-- The CoveoResultLink class should always be present since the Coveo JavaScript Framework will read it to send result clicks to Coveo Usage Analytics. -->
                <a class='CoveoResultLink'>{{=title?highlight(title, titleHighlights):clickUri}}</a>
              </div>
            </div>
          </div>
          <!-- Replacing the default excerpt by two fields extracted from my Sitecore templates. -->
          <div class="coveo-result-row">
            <div class="coveo-result-cell" style="font-size:14px;">
              <span class="CoveoFieldValue" data-field='@(Model.ToCoveoFieldName("job title"))'></span>
            </div>
          </div>
          <div class="coveo-result-row" style="margin-top:0.5em;">
            <div class="coveo-result-cell">
                {{= highlightStreamText(raw.@(Model.ToCoveoFieldName("abstract", false)).replace("<p>","").replace("</p>","").replace("<P>","").replace("</P>","")) }}
            </div>
          </div>
      </div>
    </div>
  </div>
</script>
The class is the same as the default template and the condition will tell the framework when to load that template. The id is optionnal but helps to quickly identify the templates. The template itself has been customized to show a special thumbnail and excerpt. The date and the quick view has also been removed to offer a simpler look for this type of result.
The default template will be left without any condition in order to load for all the other Sitecore templates.
Here is an example of two result type on the same page:
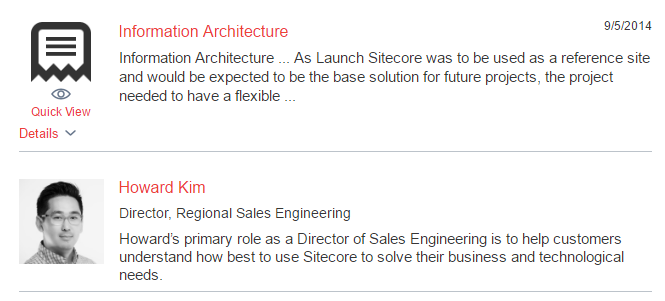
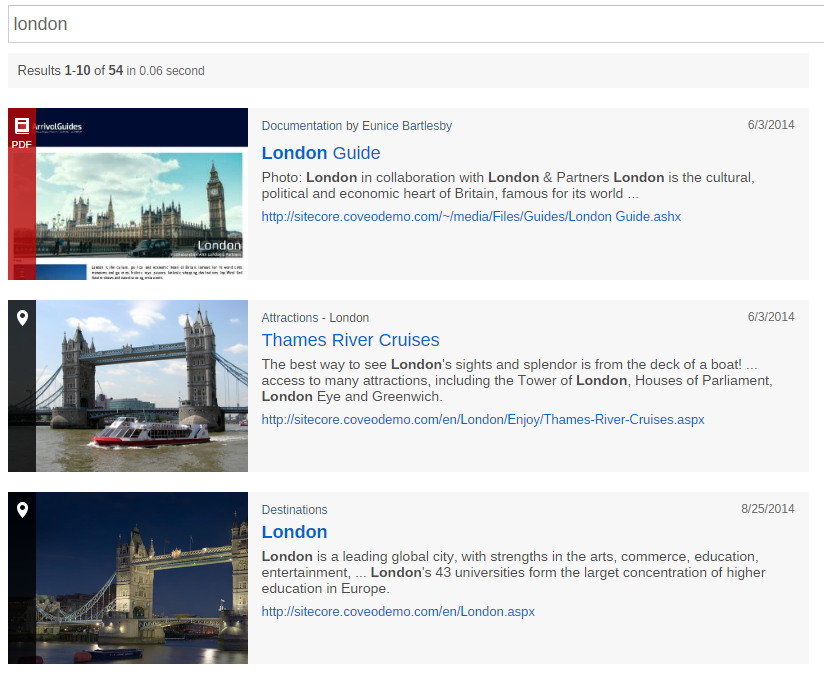
Using this logic will allow you to show different type of results on the same page without being confusing for the user. Here is another example based on file type field where the same query returns a pdf and a map location:
For more information on the result templates in Coveo for Sitecore, read the documentation.
7. Make your search results comprehensive
Make everything your visitors need searchable
By default, only the title field, URI field, and the extracted body of the document are searchable using free text queries. This means that in order for your users to search for the content of an item, you need to generate a body or manually set certain fields to be free text searchable.
In most Sitecore projects, fields on the items are only a fragment of what is displayed to the user when they visit the site. Most of the time, dynamic content will be generated when the page is rendered. This means that the best approach to create a document body when indexing is to simulate the visit of a user and index the rendered HTML of the pages. When installing Coveo for Sitecore, you will be prompted to index the rendered HTML, if you accept to do so, the HtmlContentInBodyWithRequestsProcessor is activated and will crawl the HTML content of each items with a layout. I will explain how to customize that processor in the next section.
Alternatively, you might have a fairly simple project where field values is the majority of the content on your pages. In that case the BasicHtmlContentInBodyProcessor could generate a simple body while improving your indexing performances. It does require more manual work, and you will need to plan ahead the development of your site. If you or anyone in your organisation decides to add dynamic content on your pages, you will need to find a way to add this content to the body. You could do so with a computed field or a processor in the indexing pipeline but I personaly prefer full HTML crawling since it greatly reduce setup and maintenance efforts.
Appart from generating the body of the document, you might want your users to search against additional fields. Let say that you have a taxonomy field on your items. You might not show that field on your pages, but if a user searches for a keyword matching the value of the taxonomy field, you want the content tagged to be returned. You can make a field free text searchable in the field map section of the Coveo.SearchProvider.Custom.config file. See here for a step by step guide.
Index the HTML body of pages and content of documents
I already mentioned the HtmlContentInBodyWithRequestsProcessor in the previous section. This processor will make everything on your page searchable. This is a great tool, but it can break your relevance if not configured properly.
Pages are full of repeating content (advertisements, links in the footer, navigation in the header, etc). Indexing this content will break relevance for keywords such as “home”, “link”, “back”, “about”, “contact” and more. Fortunatly, this can be fixed by adding simple HMTL comments on your pages. Here is an example:
<!-- BEGIN NOINDEX -->
<!-- HEADER AREA -->
<header>
  .....
</header>
<!-- END NOINDEX -->
<!-- MAIN CONTENT AREA -->
<div class="main-content">
  ....
</div>
<!-- BEGIN NOINDEX -->
<footer id="footer">
  ....
</footer>
<!-- END NOINDEX -->
The END NOINDEX and BEGIN NOINDEX in the example above will decide what is retrieved from the page. Take note that the for these comments to work, you need to set them as parameters in the processor. See this guide for a step by step approach.
8. Make it easy for users to assess relevance
Offer a “Quick View” capability
Coveo offers a quick view component out of the box. This feature will open a modal box showing the extracted body of the document, which I explained how to retrieve in the previous section. The quick view is declared in the default SearchView.cshtml file:
{{ if (hasHtmlVersion) { }}
    <div class='CoveoQuickview'
          data-fixed='true'
          data-width='70%'
          data-heigth='70%'
          data-template-id='CoveoQuickviewTemplate_@Model.Id'></div>
{{ } }}
The template can be found in the same file:
<script class='result-template' id='CoveoQuickviewTemplate_@Model.Id' type='text/underscore'>
    <div class='coveo-quick-view-header'>
        <table class='CoveoFieldTable'>
            <tr data-field='@@sysdate' data-caption='Date' data-helper='dateTime' />
            <tr data-field='@@sysauthor' data-caption='Author' />
            <tr data-field='@@clickuri' data-html-value='true' data-caption='URL' data-helper='anchor' data-helper-options='{text: "{{= clickUri }}", target: "_blank"}'>
        </table>
    </div>
    <div class='CoveoQuickviewDocument'></div>
</script>
You can then modify it’s style to fit your needs, or simply remove it. The Website Search Best Practices eBook recommends to use is on any results, but I would tend to disagree. Some results are fairly basic and might not need a quick view; use it instead for rich documents such as PDFs.
Provide hit highlighting and excerpts
Same as the quick view, the Coveo excerpt component will display the extracted body of the document, but since the space under the result is limited, the excerpt will be dynamic based on the keyword. The excerpt can be found on the default SearchView.cshtml file:
<div class="coveo-result-cell">
    <span class="CoveoExcerpt"></span>
</div>
The class itself already contains code for highlighting, which will clearly indicate the matching keyword.

The Website Search Best Practices eBook recommends to always provide an excerpt. It is indeed a great tool for transparency, but might not fit in your page design. I would usually recommend to make your search good before making it pretty, but if you still want to replace it by something else, make sure you keep highlighting active. As an example, see our Team Member template created in the previous section:
{{= highlightStreamText(raw.@(Model.ToCoveoFieldName("abstract", false)) }}
The excerpt was replaced by a custom field. To activate highlighting, you can simply use the highlightStreamText helper.
That’s enough for now folks! If you wish to keep reading, the full series can be found here.